
When I first came across my kitchen ceiling it was full of cracks and had paint peeling off all over. I was almost completely new to DIY and decorating and certainly didn't fancy tackling a ceiling with paper. The task of smoothing the flaky paint to return it to a good surface was too huge so I'm afraid I scraped the loose paint off, filled the cracks and covered the whole surface with polystyrene tiles. This looked better than the awful cracked and flaky surface but was completely uninspired and uninspiring. At that stage I didn't place too much importance in the ceiling. There were far more pressing matters to deal with such as the ghastly yellow formica worktops and imitation wood formica cupboard doors on the too few cupboards and a truly dreadful carpet, yes carpet!
Over the next few years, I renovated the whole house, including every element of the kitchen, until all that was left to do was the ceiling. Remembering its poor state, I didn't really like the idea of removing the tiles and preparing the surface for painting or papering. I had been looking at tin tiled ceilings and rather liked the look. They would require the removal of the polystyrene, but not any work to the surface. However, I couldn't find any tiles I liked enough. I liked the idea of plasterwork but having installed several plaster ceiling roses in other rooms, I was loathe to use such a heavy medium. It is really hard work lifting such a heavy weight above one's head and I didn't think the ceiling could carry the excessive weight involved. Imagine if, after all the hard work, the ceiling collapsed destroying everything! A chance encounter with a website describing how the vaulted ceilings and fine plasterwork details in historic buildings were actually papier mache inspired me to make my own panels using paper pulp and strips. I came across a wonderful website about Papier Mache, full of recipes and resources and a community of artists working with paper and run by a lovely lady, Jonni Good who develops recipes and patterns for marvellous paper works of art. https://www.ultimatepapermache.com. Other websites were trawled too and I came across an excellent technique for making paper pulp,which I employed. I followed it to the letter at first, but later developed my own method. You can find it here;
http://www.papiermache.co.uk/tutorials/how-to-make-pulp-ala-miranda-rook/
Another wonderful resource if you want to know how to do almost anything is here;
https://davidneat.wordpress.com/
http://www.papiermache.co.uk/tutorials/how-to-make-pulp-ala-miranda-rook/
Another wonderful resource if you want to know how to do almost anything is here;
https://davidneat.wordpress.com/
The first thing to do was design the panel and create it in clay. Gothic is the theme in the kitchen and I love quatrefoils and fleur de lys. Here goes...
 |
| Day 1. Pattern started. |
 |
| Day2. Progress being made. |
 |
| Day5. Finished clay fleur de lys. |
I modelled the first quarter in clay which took me 5 days, then made a plaster mould. Originally, I had thought to make each of the quarters different, but I decided it was too much work and would be too fussy-looking. The plaster mould was then used to reproduce the other three quarters. This saved me a lot of time and effort. To make the mould, I placed a wall of corrugated cardboard around the perimeter, sealed with clay. This was then filled with basic casting plaster and left to dry overnight. It is possible to remove the mould from the clay in an hour. As soon as the plaster is cold, it has set and can be removed from the clay original.
 |
| Ready to pour the plaster |
 |
| Plaster poured. |
Once the mould was made, I simply pressed soft clay into it until the pattern was filled and then carefully prised the clay form out in a peeling motion from side to side and top to bottom. This resulted in a very good replication of the original clay design that needed only a little repair and smoothing. I drew the outline of the quatrefoil onto a piece of plastic groundsheet and placed each quarter piece in position.
The next thing to do was to model a centrepiece to join it all together. I wanted to create real depth with the centre descending into the room. A seed pod achieved the effect I wanted.
 |
| Centrepiece |
 |
| Whole design inside marked quatrefoil. |
Once I was happy with the position of each element, I set about smoothing the clay with a soft paintbrush and water. The whole is not entirely symmetrical, but that is not something that troubles me. I am not a machine and each piece is slightly different after repairs made to damage caused when removing the clay from the mould. I also had to adjust the quarters slightly to accommodate the centre, removing some clay from the bottom of each.
 |
| Smoothing the clay with water. |
Last of all, I modelled the outside edge with rolls of clay squeezed through a clay gun. One roll was not thick or deep enough so I used three and blended them together. Two on the bottom and one on top for height. I cut out a shape in plastic and ran it around the clay to create as uniform an edge as possible. Again, not perfect, but good enough.
 |
| Finished clay master. |
The whole panel is 30" square. Rather large, Which is just as well as I hadn't even thought about how long the paper pulp used to make the panels would take to dry. Anyway, I am getting ahead of myself.
The next stage was to make the plaster mould.
I removed the seed pod from the centre and cut it in half length ways. The two halves were placed inside an old margarine container, flat side down, fitting fairly snugly with just enough space all around and plaster poured over to cover. When the plaster had set, it was easy to tap out of the container and I had a very neat mould with no wastage. After about a week of drying out, I sealed the inside to make it waterproof. Most sculpture sites advise the use of shellac to seal plaster moulds, but it is very expensive. I happened to have an old tin of damp prevention paint in the garage and that is what I used. It did an excellent job.
For the main mould, I made a frame using strips of 2x1" wood to surround the clay, sealed the edges with wet clay and drew the groundsheet up around the frame to make sure the plaster couldn't find a way out. It took several buckets of plaster to cover the clay and I worked as quickly as possible, to ensure one layer did not set before the next was poured on, nudging the table as I worked to bring air bubbles to the surface. This ensured the layers were bonded together. About half a 25kg bag of plaster was used, perhaps more.
When it had set, it was rather heavy. It occurred to me that I hadn't reinforced the mould as I was making it and I was a bit afraid it might break when it was turned over. after all, it was only a couple of inches thick but over 36" square. I fixed more wood strips to the back with plaster and scrim for support. The process of turning it over was nerve-racking and I enlisted the help of my husband. We lifted it upright to rest on one edge then carefully slid the whole thing backwards to the edge of the table so there was room to lay it down. We carefully, but fairly quickly lowered it so it was resting on the table wood strips down. I say quickly because I didn't want to put prolonged strain on it as it was lowered, and carefully because I didn't want it dropped. We successfully had turned it over with no damage, what a relief! It was very satisfying peeling off the groundsheet and removing the clay to reveal a perfect negative mould, although I found it a little hard to discard the beautifully modelled clay into the clay bin for re-use another day. I always find this a bit difficult after all the hard work that has gone in to the modelling. The mould was left to dry for a week before I sealed it with several layers of shellac. Yes, shellac. I had capitulated and gone for the recommended method of sealing given that it was a very important mould. However, on reflection, I think the damp seal paint would have done the job beautifully and cost me nothing as I already had it. Once sealed I was ready to begin what turned out to be a very long process of making the ceiling panels using paper pulp.
First, I had to make the pulp. I had been collecting egg boxes, newspaper, magazines, envelopes and any other paper I could lay my hands on. This all went into a big bin after being shredded or torn into small pieces. I followed the process found here. Rather than using a stick blender for the final refinement of the pulp though, I used my old, falling to bits Magimix. It has a very powerful motor and large bowl for processing more pulp at a time.
I removed the seed pod from the centre and cut it in half length ways. The two halves were placed inside an old margarine container, flat side down, fitting fairly snugly with just enough space all around and plaster poured over to cover. When the plaster had set, it was easy to tap out of the container and I had a very neat mould with no wastage. After about a week of drying out, I sealed the inside to make it waterproof. Most sculpture sites advise the use of shellac to seal plaster moulds, but it is very expensive. I happened to have an old tin of damp prevention paint in the garage and that is what I used. It did an excellent job.
 |
| Seed Pod Mould |
For the main mould, I made a frame using strips of 2x1" wood to surround the clay, sealed the edges with wet clay and drew the groundsheet up around the frame to make sure the plaster couldn't find a way out. It took several buckets of plaster to cover the clay and I worked as quickly as possible, to ensure one layer did not set before the next was poured on, nudging the table as I worked to bring air bubbles to the surface. This ensured the layers were bonded together. About half a 25kg bag of plaster was used, perhaps more.
 |
| Plaster mould setting. |
When it had set, it was rather heavy. It occurred to me that I hadn't reinforced the mould as I was making it and I was a bit afraid it might break when it was turned over. after all, it was only a couple of inches thick but over 36" square. I fixed more wood strips to the back with plaster and scrim for support. The process of turning it over was nerve-racking and I enlisted the help of my husband. We lifted it upright to rest on one edge then carefully slid the whole thing backwards to the edge of the table so there was room to lay it down. We carefully, but fairly quickly lowered it so it was resting on the table wood strips down. I say quickly because I didn't want to put prolonged strain on it as it was lowered, and carefully because I didn't want it dropped. We successfully had turned it over with no damage, what a relief! It was very satisfying peeling off the groundsheet and removing the clay to reveal a perfect negative mould, although I found it a little hard to discard the beautifully modelled clay into the clay bin for re-use another day. I always find this a bit difficult after all the hard work that has gone in to the modelling. The mould was left to dry for a week before I sealed it with several layers of shellac. Yes, shellac. I had capitulated and gone for the recommended method of sealing given that it was a very important mould. However, on reflection, I think the damp seal paint would have done the job beautifully and cost me nothing as I already had it. Once sealed I was ready to begin what turned out to be a very long process of making the ceiling panels using paper pulp.
 |
| Sealed mould ready to be filled |
First, I had to make the pulp. I had been collecting egg boxes, newspaper, magazines, envelopes and any other paper I could lay my hands on. This all went into a big bin after being shredded or torn into small pieces. I followed the process found here. Rather than using a stick blender for the final refinement of the pulp though, I used my old, falling to bits Magimix. It has a very powerful motor and large bowl for processing more pulp at a time.
 |
| Bin full of soaking paper matter. |
 |
| Stage 1 Pulp before final blending. |
I found the magimix so good at blending the pulp after two bin loads using the aforementioned method and a hand drill for the initial pulping, I skipped the drill mixing stage and used only the magimix to pulp the soaked paper. I did stop using cardboard though and only used paper and egg boxes which produced a lovely smooth mix. An old pair of tights cut into pieces and tied in a knot at one end made an excellent job of straining the pulp. The water was easily squeezed out.
I needed to put a release agent in the plaster mould and decided to try petroleum jelly. It is cheap and readily available. It was quite fiddly brushing it into every crevice of the mould and the first time took me hours. As with most things though, I became very adept at it and soon it only took a matter of minutes each time.
The first panel I made, I used a very thin smearing of petroleum jelly after reading this was the best thing to do in order to prevent the jelly sticking to the surface of the dried pulp and making it difficult to paint. I reinforced the centre with three layers of paper strips glued on with PVA as it was quite a large area and I was worried it would break up during removal. The pulp was painstakingly pressed into the mould as hard as I could using a flat wooden clay modelling tool which took me a whole week. I glued sheets of newspaper over the top in three layers to make the backing and left it to dry. This took several days in the summer heat.
I proceeded to try to remove the panel from the mould peeling the backing layers away and trying to lift it out section by section. It was a complete disaster. It broke into many pieces and stuck to the mould in places. The only piece that was intact was the centre which I has reinforced with three layers of paper strips. However, I was very pleased with how the pulp had taken the intricate detail. I was naturally disappointed that over a week's work had been wasted, but valuable lessons had been learned. I cleaned the mould with a damp cloth to remove any remaining pulp and started all over again.
I needed to put a release agent in the plaster mould and decided to try petroleum jelly. It is cheap and readily available. It was quite fiddly brushing it into every crevice of the mould and the first time took me hours. As with most things though, I became very adept at it and soon it only took a matter of minutes each time.
The first panel I made, I used a very thin smearing of petroleum jelly after reading this was the best thing to do in order to prevent the jelly sticking to the surface of the dried pulp and making it difficult to paint. I reinforced the centre with three layers of paper strips glued on with PVA as it was quite a large area and I was worried it would break up during removal. The pulp was painstakingly pressed into the mould as hard as I could using a flat wooden clay modelling tool which took me a whole week. I glued sheets of newspaper over the top in three layers to make the backing and left it to dry. This took several days in the summer heat.
 |
| Pressing pulp into the mould. |
 |
| Whole mould pulped. |
This time, I slathered plenty of petroleum jelly into the mould paying particular attention to the areas that had stuck previously. The whole piece was given three layers of paper strips and glue for strength and I did not glue the backing layers on. I made the backing separately on another table, using wallpaper paste to glue layers of newspaper into a sheet large enough to accommodate the panel. Everything was left to dry.
 |
| Pulp and strips in progress. |
Each section was removed separately. There was plenty of flexibility as they were hollow rather than filled solid and plenty of strength thanks to the added layers of strips and PVA glue. I was very relieved they were all pulled from the mould without too many problems. The extra petroleum jelly certainly helped as did the extra water in the pulp. These two elements insured the panel pieces shrank away from the mould as they dried making removal very easy. The only places that stuck were the deepest and were not quite dry when I removed them. They suffered some damage which would need repairing.
I made a frame the correct size to fit the pieces into using 2x1" wood strips. Each piece was placed onto the dry backing and when I was satisfied, I marked the position with a pen. Then came the messy bit. Each edge had a thin line of adhesive cartridged on. I did the outside quatrefoil first. It was very floppy being just a thin outline and I managed to cover my arms with glue as I flipped it over onto the backing. The remaining pieces were no problem at all. Then I weighted the whole thing with anything I could use. Tubes of paint, jam jars filled with water, kitchen scale weights etc. This ensured a good bond to the backing and made sure the whole panel was flat.
The next day I removed the weights and was looking at my first paper pulp panel.
I made a frame the correct size to fit the pieces into using 2x1" wood strips. Each piece was placed onto the dry backing and when I was satisfied, I marked the position with a pen. Then came the messy bit. Each edge had a thin line of adhesive cartridged on. I did the outside quatrefoil first. It was very floppy being just a thin outline and I managed to cover my arms with glue as I flipped it over onto the backing. The remaining pieces were no problem at all. Then I weighted the whole thing with anything I could use. Tubes of paint, jam jars filled with water, kitchen scale weights etc. This ensured a good bond to the backing and made sure the whole panel was flat.
 |
| Weights on panel. |
 |
| 1st Panel glued to backing. |
This was the first of 27 panels that were made in total. Before I commenced painting it, I filled the mould for the second panel. However, I made the paper pulp a little wetter which made it easier to press into the mould and I had it done in three days, rather than the week the first had taken. As I made more, I sped up and could complete the pulp in a few hours and add the strips in a couple of hours the next day. As one mould dried, I painted and installed the previous one. But I am getting ahead of myself again.
The largest repairs were made using very firm pulp, with as much water removed as possible, mixed with PVA glue. Smaller repairs were made using decorator's filler. The panel was then given a base coat of emulsion paint to seal it, fill hairline cracks and provide a primer for the final acrylic colours. Luckily, I had a selection of emulsion paints left over from past decorating projects and this was the perfect opportunity to use them up. There had been some concern over the liberal use of petroleum jelly as a release agent in case it affected the paint going on. I had absolutely no problems in that department. The petroleum jelly had left no residue and did not affect the emulsion paint going on. The final colours were painted on using Artist's Acrylic paints, including the metallic golds. I found the best price at The Works. For the most part, I managed with only one coat of paint. I used the colours as they came out of the tube. I didn't want to have to start mixing colours as I would have a lot of work replicating them for all the panels and I liked the colours anyway. The only exception was the bronze used on the quatrefoil. I mixed that using metallic copper and a drop of black. Sap Green, Crimson and a rich gold were the other colours. The whole was then given a coat of pale gold to give a metallic sheen to the panel. At this stage, the background colour was just a mottled effect using the residue on the brushes of all the colours.
 |
| Painting of First Panel in Progress |
Once it was painted. I trimmed the excess paper away and Voila! my first complete panel.
 |
| First Panel Complete |
Positioning the first panel took some consideration. In each half of the kitchen is a central chandelier. I could fit the panel centrally, losing the middle and having to cut the panel in half to fit it around the chandelier. Another option was to remove the chandelier to put the panel up then replace it. I opted for the third idea. I positioned the panel to one side of the chandelier centre so the when the second panel was positioned, the chandelier would be between two panels in the gap formed by the quatrefoil edges. Getting this just right was not easy. I used a combination of screws and glue to stick the panel to the ceiling and used a variety of brooms on stepladders to hold it in place until it had dried. I had also wallpaper-pasted the backing and this was brushed onto the ceiling when the panel was up. I don't want the backing to start bubbling in the steamy kitchen and pasting it up will prevent that from happening.
 |
| First Panel Supports |
When I came to paint the second panel, I decided to experiment with the background colour. The background on the first panel was dark and looked darker when it was on the ceiling, (all colours look darker on a ceiling) and I was aware I would have to paint the gaps between the panels the same as the background. I had come across some lovely copper metallic acrylic and thought I'd try it. I really liked the effect even when it was on the ceiling.
 |
| Copper Background |
When I had enjoyed a little break and recharged my batteries, I returned to making panels with renewed vigour. I was resolved to finish what I had started and to complete my project and realise my vision. The more panels I made, the quicker I became at getting the pulp in and painting. What had originally taken me a week to do I could get done in a couple of days and by the end, I could paint a panel from start to finish in a day, during warm weather. However, as the year went on, it became apparent the mould was cracking and deteriorating. At first, I just filled the cracks with wet clay each time I was ready to put the pulp in. I was becoming concerned that the mould would not survive long enough to make the number of panels I would need to complete the project.

Each time I pulled the pieces of a panel from the mould, the damage was worse. Soon chunks were pulling off with the dried pieces and had to be glued back into place. What was I going to do? I was starting to get a bit stressed about it.

I very briefly considered making another clay version and a new mould. I really couldn't face it. It was taking everything I had in me to plod on with it as it was. As I had been working from the centre outwards, if I couldn't make enough panels to complete it would be the edges and corners of the room without panels to fill them. Perhaps I could do something else around the edges? I worked out that in a few areas I would need just over a half a panel so instead of using a whole panel I could do two areas with one panel cut in half and just space it on the backing slightly differently. There were two spaces quite a lot over half a panel space. For these I decided to add a few spare pieces of scroll work taken from panel offcuts and extended the quatrefoil pieces. For the remaining spaces, I had an inspiration. Fanned vaulting! I just needed to make the last two panels. Luckily, the mould just held out long enough albeit with some extensive filling of huge cracks. After I pulled the last pieces from the mould, it was beyond repair and unusable. Some would say it was unusable before this point, but I needed those last two panels!


I don't really know why the panel deteriorated as it did. Perhaps I made the plaster mix too weak when I made the mould or perhaps it was just the nearly two years spent in the damp and heat of winter and summer. The smaller moulds remain absolutely fine, but they were both sealed with the damp prevention paint not shellac. It is a mystery for now.
Having decided to make fanned vaulting in the corners and around the edges where necessary gave me a new burst of creative energy. I was still restricted to making very lightweight pieces and liked the idea of completing the project using paper. I liked fact that the panels were obviously made from something other than plaster and the backing was clearly paper. They had an imperfect finish and I liked it. I wasn't really sure where to start and toyed with ideas trying to work out the best way to achieve the effect I wanted. One night as I was going to sleep, it came to me. I made cardboard ribs taped together at the back and fanned out to the correct shape. These were then taped and glued in position on the walls and ceiling. The same method was used for all the fanned vaulting each space was individually tailored to fit. The corner pieces were much larger than the others.
My next problem was working out how to achieve the curved outer ribs to complete the effect of fanned vaulting. I experimented with plastic tubing as I couldn't think of a way to create the rounded ribs using paper or pulp. The tubing was too stiff and heavy to glue to the curves. How about rope? too many prob;ems with frayed ends and I didn't want a rope texture. What I needed ideally was something very lightweight and very flexible. I trawled the internet for extruded rubber shapes but the cost would be huge. I happened upon some expanded foam rolls just the right diameter. It is used to fill gaps in the building trade. It was perfect for what I wanted to do. I glued it on to the paper using cartridge glue and was delighted with the effect.


I don't really know why the panel deteriorated as it did. Perhaps I made the plaster mix too weak when I made the mould or perhaps it was just the nearly two years spent in the damp and heat of winter and summer. The smaller moulds remain absolutely fine, but they were both sealed with the damp prevention paint not shellac. It is a mystery for now.
Having decided to make fanned vaulting in the corners and around the edges where necessary gave me a new burst of creative energy. I was still restricted to making very lightweight pieces and liked the idea of completing the project using paper. I liked fact that the panels were obviously made from something other than plaster and the backing was clearly paper. They had an imperfect finish and I liked it. I wasn't really sure where to start and toyed with ideas trying to work out the best way to achieve the effect I wanted. One night as I was going to sleep, it came to me. I made cardboard ribs taped together at the back and fanned out to the correct shape. These were then taped and glued in position on the walls and ceiling. The same method was used for all the fanned vaulting each space was individually tailored to fit. The corner pieces were much larger than the others.
 |
| First Fanned Ribs |
Thick lining wallpaper was glued to the curved ribs in separate pieces.
 |
| Lining paper glued to curved ribs |
My next problem was working out how to achieve the curved outer ribs to complete the effect of fanned vaulting. I experimented with plastic tubing as I couldn't think of a way to create the rounded ribs using paper or pulp. The tubing was too stiff and heavy to glue to the curves. How about rope? too many prob;ems with frayed ends and I didn't want a rope texture. What I needed ideally was something very lightweight and very flexible. I trawled the internet for extruded rubber shapes but the cost would be huge. I happened upon some expanded foam rolls just the right diameter. It is used to fill gaps in the building trade. It was perfect for what I wanted to do. I glued it on to the paper using cartridge glue and was delighted with the effect.
 |
| Foam piping added |
The edges where the thick lining paper met the backing paper were overlapped with strips of pasted newspaper to create an (almost) invisible join. The whole was then painted with a base coat of emulsion before finishing with the copper acrylic and the ribs in gold. Painting the copper and trying to achieve a streak-free finish was troublesome. After some trial and error, I discovered the best way was to paint the copper on using a brush and then smudge it all over with my fingers both horizontally and vertically. This method produced the smoothest finish without streaks or visible brushstrokes. A new take on finger painting!
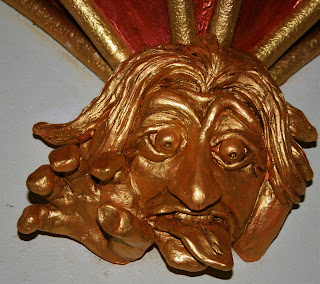
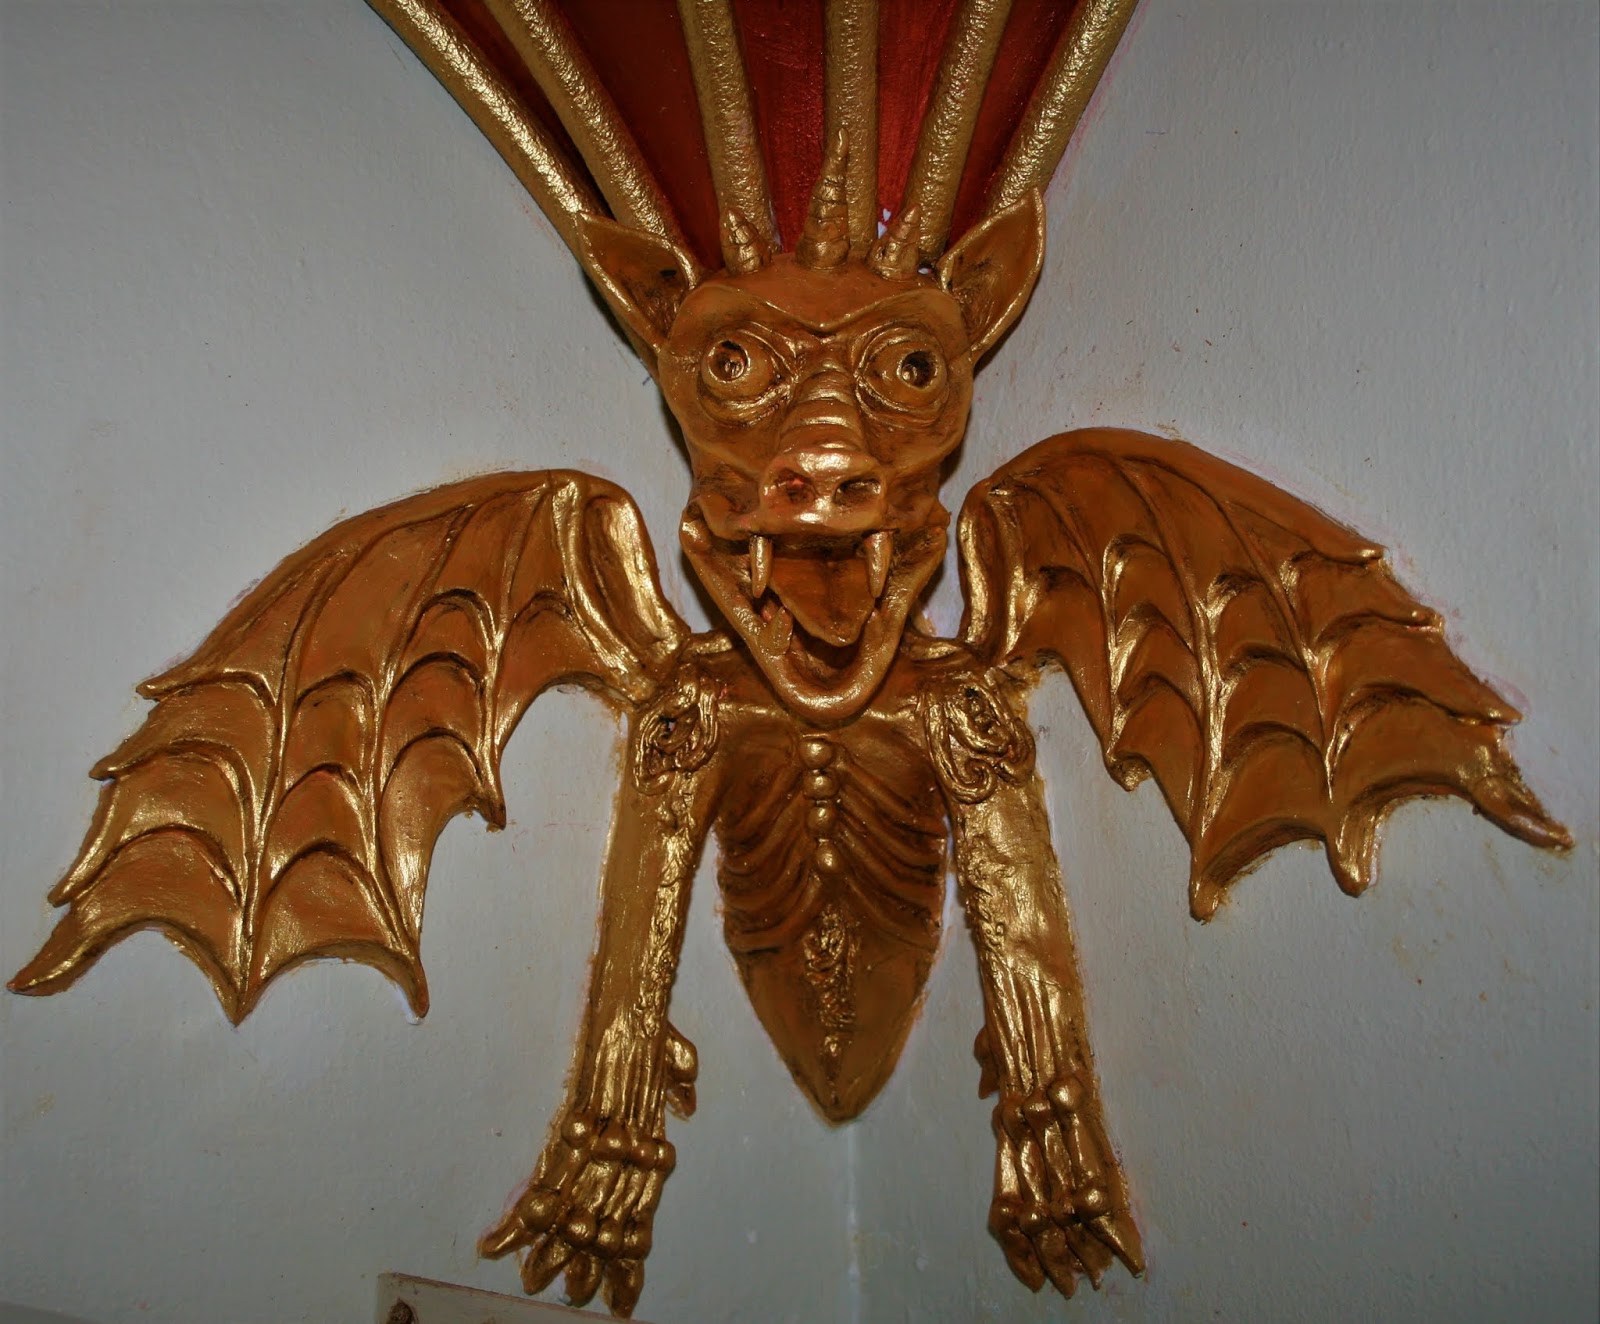
While this was going on, I was working on a series of gargoyles to add to the bottom of each fanned vault. I decided to model them in air-dry clay. Each one was going to be a one-off piece of sculpture so there was no need to make a mould to cast more copies. I love working with clay so it seemed the obvious choice of medium. The five gargoyles around the walls were based on people I know, including myself. The four corner gargoyles were fantastic creatures, chimerae. When dry, each was given a base coat of emulsion paint then painted gold to match the ribs in the vaulting. To give more depth to the detail and features, the gold was gone over with coloured furniture wax, the excess being removed from highlights and left in the crevices.


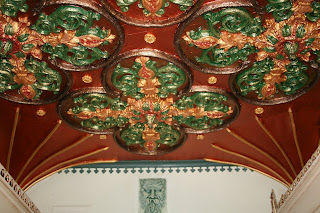
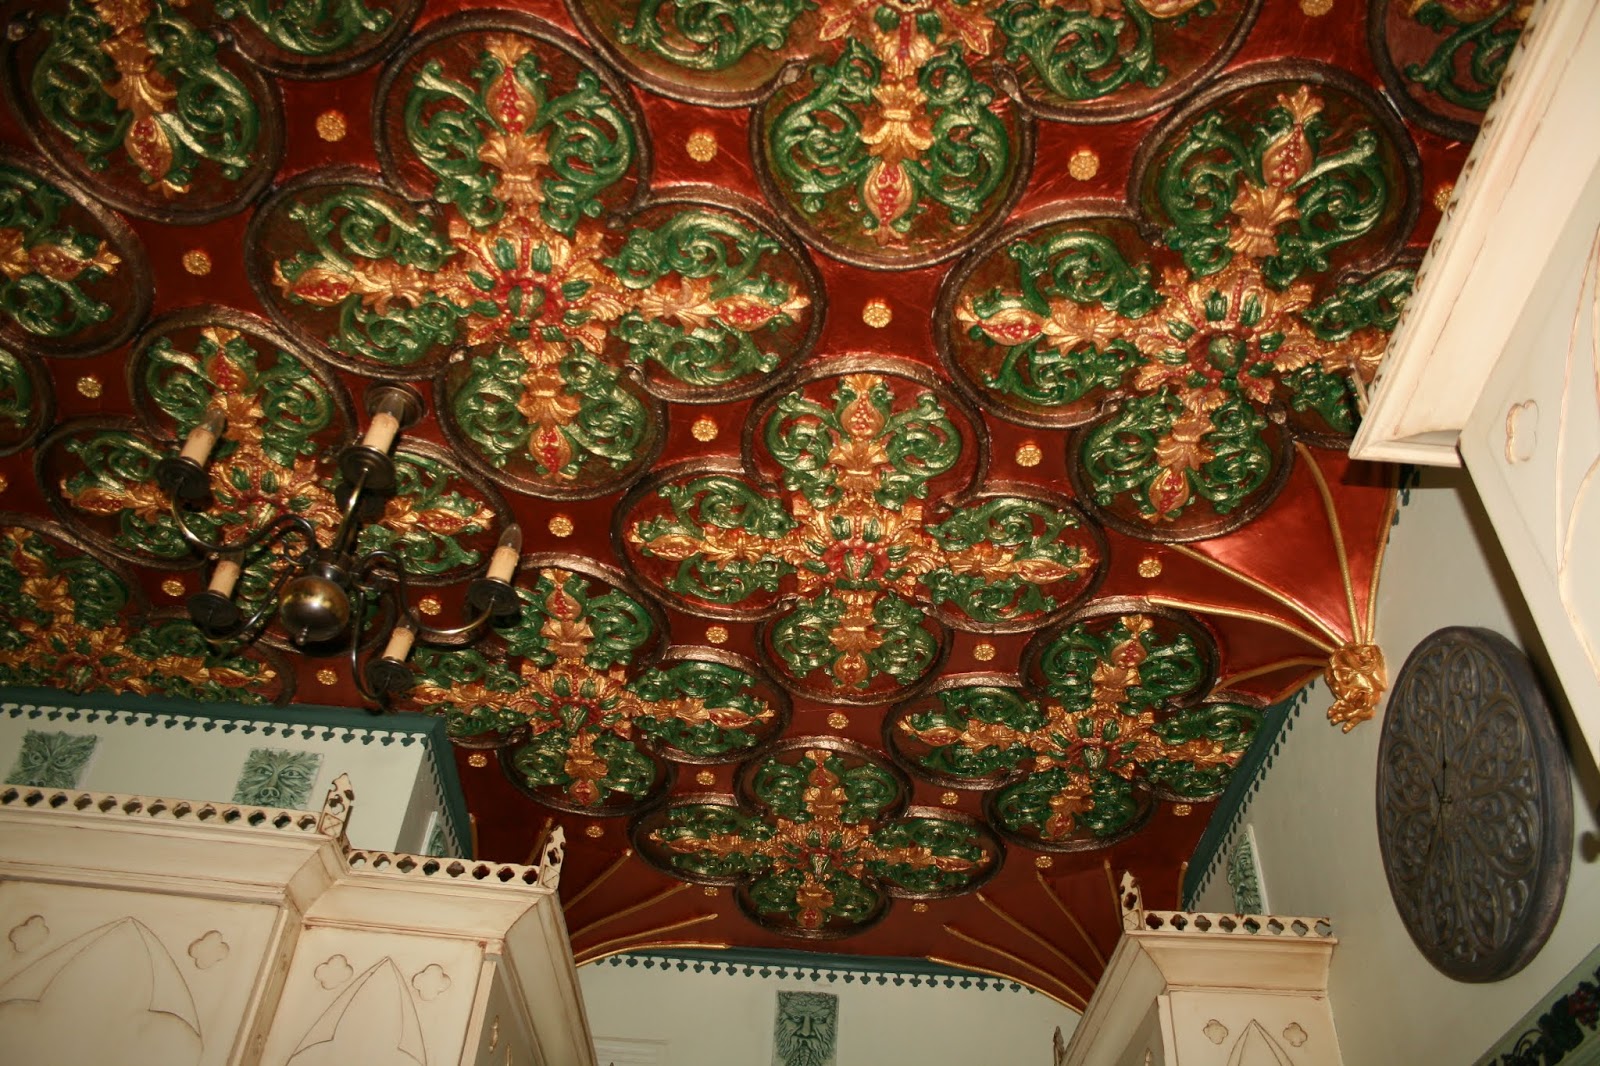
The finishing touch was in the form of Tudor roses cast in plaster and painted gold, stuck in between the panels. Here is a selection of pictures from different angles in the kitchen. The ceiling comprises of 27 panels, nine fanned vaults and nine gargoyles plus 87 roses, covering an area of 21'x11'. It has taken me over two years of work and a few grey hairs. I have enjoyed some of it and endured most. I have a massive sense of achievement and enormous personal satisfaction for having stuck with it. I enjoy looking at it every day. I strongly believe that one should be surrounded with beauty and art and enjoy one's surroundings. Living in this way inspires, satisfies and sustains us through life. I could not live in a minimalist home with white walls and nothing to look at, which seems to be the trend these days. I would shrivel-up and die. How soul-destroying! Art, Music, Sculpture, Dance, these are the things that make life rich and enjoyable for me. I surround myself with all these things and enjoy life every moment of every day. Can you say the same?


I welcome comments and questions. Feel free.
All content and pictures are the sole Copyright of Sarah Manchester. Do not copy without permission.