At last! I have finally got around to sculpting the Archangel Michael. I have wanted to sculpt him for years. He is my favourite. My husband and I have several small sculptures of Michael defeating the Devil, in the usual Romanesque style. I didn't want to do the same. I has been done many times before and much better than I could manage. What I really would love to make is a giant sculpture for the front drive. Probably using Papercrete over chicken wire armature. Since it would be so visible to everyone passing, it would have to be excellent. Am I up to it? The idea developed into a sculpture of both Raphael and Michael. Perhaps back to back or even combined to share wings. The problem with putting a sculpture in the drive is that it cuts it in half. No more in and out driveway. It would also block light. The idea is on hold for now, but a smaller version, possibly to be used a maquette for a larger sculpture is now in progress. Raphael has been sculpted and is drying while Michael is created, before being painted. They both started life in the same manner. They have the same base and the same wing armature. They are the same height and body shape, but the poses are different, of course. I prepared both armatures before concentrating on Raphael. It is important for me to concentrate on one at a time. I like to really immerse myself in whatever I am working on. Michael has completely different attributes to Raphael and I couldn't go back and forth from one to the other. It took me a few days after completing Raphael to find the right head space to focus on Michael.


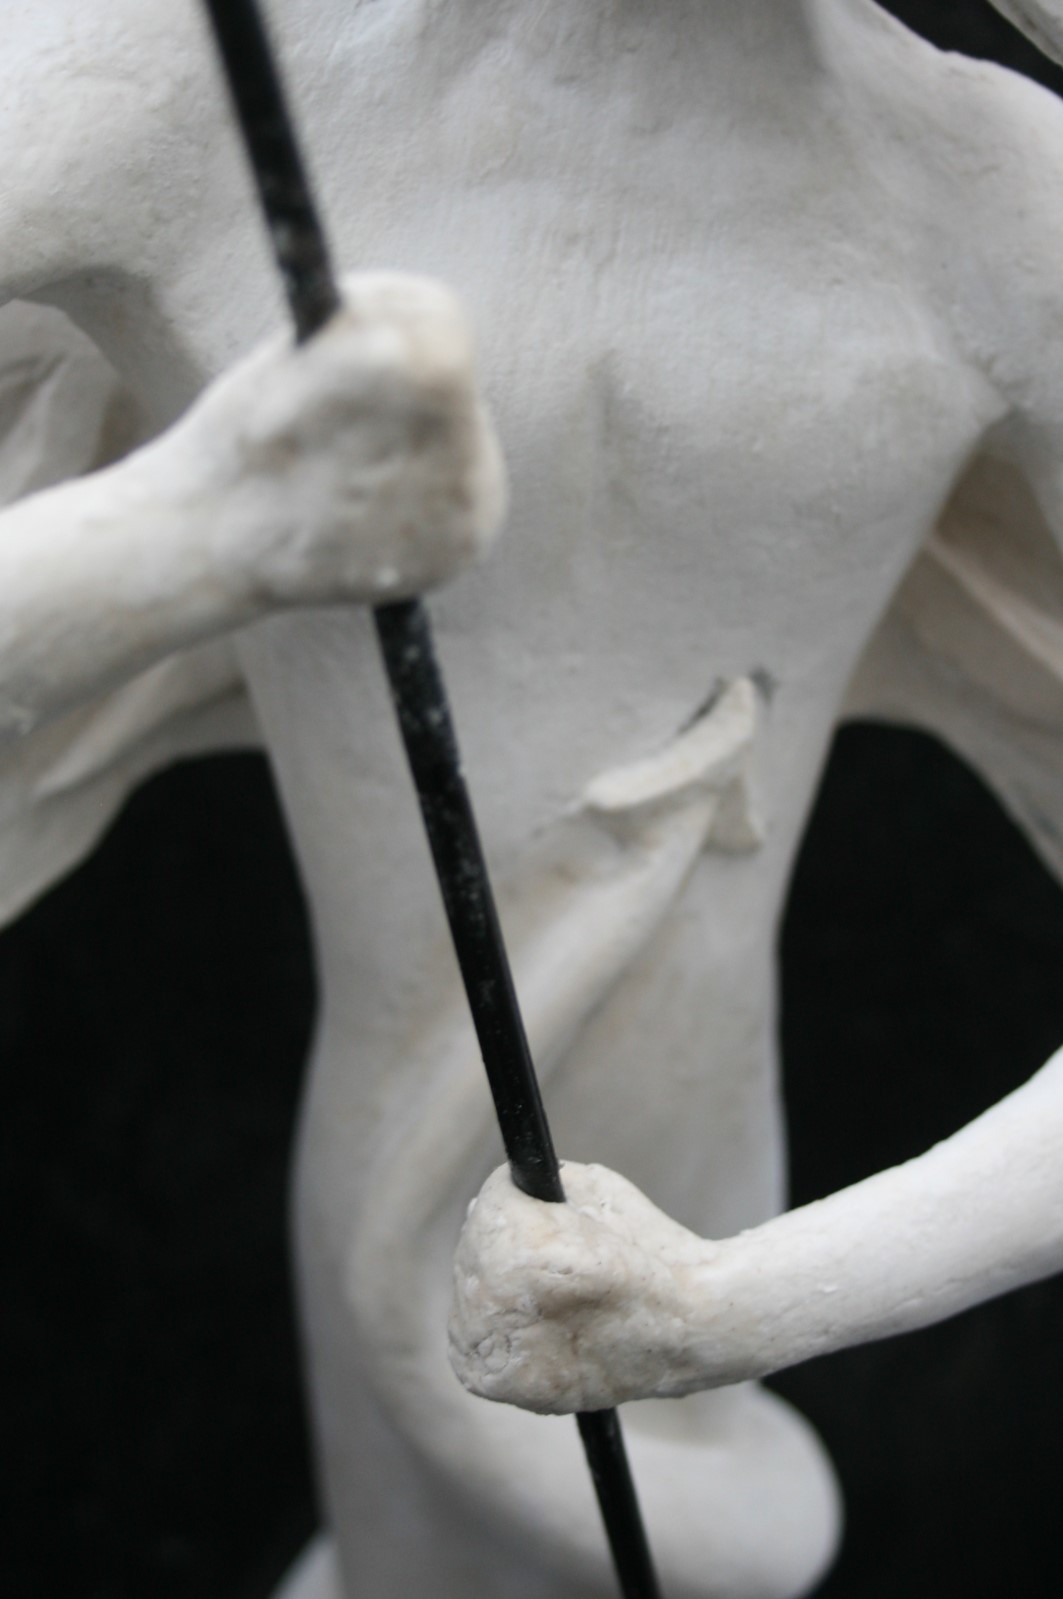
These pictures show Michael's basic armature and the stage I left Michael at before working solely on Raphael. The armature is made from lengths of garden wire fixed into a plaster base cast in a pudding basin. The body shape is made using tin foil and coated in paper clay. The paper clay can be smoothed on very thinly and sets very hard. The position of the arms was determined by me using a broom handle and taking up the position in a mirror. The spear rod was inserted into the part of curved wire that will be the hands to get the final position correct.
If you have read the Raphael blog, you will know about the reinforcing of the armature and the widening of the base done to both sculptures due to the top-heavy nature of the design when the wings are covered. As long as the sculptures aren't knocked, they would be fine, but are liable to topple over if helped along. It was a lesson learned in giving the sculptures a strong enough armature and a wide enough base with enough weight. As Michael was in the very early stages as above, it was no real hardship to cut him off at the base, drill out the remnants of wires, cut him open and tie the existing wires to a strong steel rod, before sticking the halves back together and covering the joins. A wooden dowel would have done the job, but I happened to have a piece of steel rod from an unused garden lantern and didn't have a piece of dowel. As much as possible, I try to utilise things to hand. The process is described in more detail on the Raphael post, but here are the pictures to illustrate what was done.


Michael was started with his head upright, following the line of the body armature vertically. When I came to focus on him and started to think about the position of the serpent he was spearing, I realised his head needed to be angled downwards. He already had coat of paper clay all over his head and neck, which had set hard. This was not a problem, however. Although the clay was hard, providing an excellent base to add detail to, it was only a very thin crust. I easily broke Michael's neck, bending it forward.


The neck now looked too short, so I pulled the head up a bit. I was able to do this as the armature inside the head, although curved over, was surrounded by foil and there was enough give in it to allow me to raise the head sufficiently for my needs. I didn't fix the head in position at this point, as I find it very difficult to work on facial features when they are at an angle. In this case, looking down. I had to raise the head back into the upright position to work on it. I expect it is a matter of lack of experience and I hope to overcome it in time or I shall have difficulty sculpting my next project.


Here you can see the wires emerging from the body, showing how the wings attach. this enables me to play around with the position of the wings right until the last minute, even after the feathers have been modelled. Once the wings has a single layer of paper strips added front and back, I started adding shape to the figure using paper clay.

Once the basic shaping was done, I moved to the face. I had given myself sufficient time to get Raphael's features out of my mind and I could focus in on Michael's face. I started adding the planes and features using a stiff mix of decorator's filler. It models well, sets overnight and is very hard, can be sanded and carved. Perfect for delicate features such as faces and hands.


I experimented with the face and at one point added some plaster only to decide I liked it as I had it before so it was sanded off. Eventually, I was happy with the face. More or less.

The next thing to do was to fix the neck into position. It took a few goes until I was satisfied and I really stretched the neck up to get the angle I wanted and added some muscle detail. Again, more aesthetic than anatomically correct.


The hair came next. I pretty much got it as I wanted it on the first go. I pinned foil shapes to the head and shaped them as I liked. The Michael sculpture is more upright in shape overall and I reflected this in the hair design. There were some changes made as I progressed, but nothing major. It is similar stylistically to Raphael, but is also unique to Michael.

Wires were inserted into the head to support the foil shapes

Once the foils had been covered with paper clay, I needed to hold a couple of them in a slightly different position while they dried. I tied masking tape around them to achieve this. Coming together.

'
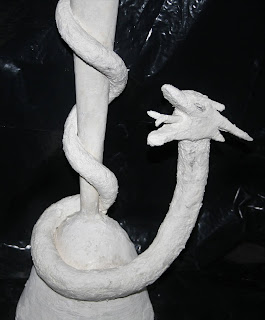
 Next came the serpent. I had a pretty good idea of what I was doing. I wanted it to be wrapped around Michael, echoing the serpents around Raphael. The difference is that Raphael's are wrapped heads up and Michael's with head down at the bottom to indicate the difference between Good and Evil. Raphael's snakes wrap clockwise, whereas Michael's serpent is anti-clockwise from the tail around to the head. I needed to support the head end as it would be unsupported by the sculpture, unlike the tail and most of the body wrapped around Michael. I fixed a piece of thick garden wire into the base at the point where the snake's body would start to veer away from the base, by drilling a hole large enough to insert a looped wire and filling it with decorator's filler. By the next day, it was firmly set.
  I pulled a long length of foil from the roll and scrunched it into a long, thin strand and kept adding increasingly shorter lengths until it was thicker at one end and tapered gently to the tip of the tail. I didn't bother to place a piece of wire inside along the length as the body and base would support it as it coiled around. I positioned it around the body and roughly along the wire just to make sure it was long enough and to see where I wanted the coils to sit. I used hot glue to stick the coils in place and also to hold the coils away from the body to allow a more rounded shape when the foil was covered in paper clay. When I looked at it with the spear in place, the end of the tail was obscured. Perhaps I should have it going straight to the side rather than turning up on the last coil? No. That would detract from the spear. Too fussy. I lengthened the tail slightly and had it pointing towards the heart. I think that is a much more interesting idea. the tail will have a sharp pointed head to it, echoing the spearhead piercing the serpent's body. If it could, the snake would pierce Michael's heart in revenge. I like that. However, the devil is defeated by Michael and the tail will just hover near his heart.
Happy with the position, I gave the whole snake a coat of paper clay and left it to set overnight.


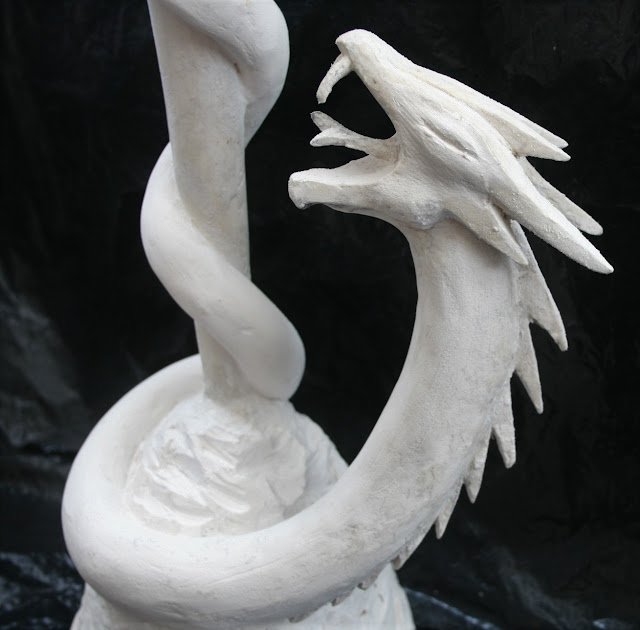
The head has caused me some difficulty. The Devil is often depicted as a snake or a dragon, or humanoid with a serpent's tail and hideous countenance. I had originally planned to model a straight-forward snake head, but it seemed a little low-key for the subject matter. Michael defeating Satan deserves something more. I wondered whether to make the head more like a dragon and perhaps add wings which could wrap around the base, much like the fish does on Raphael's base. Umm. I decided to just start modelling and see what happened. I'll let it dictate to me as I go along, I said to myself.
 I began adding some shards to emphasise the angle of the head as the body is pierced and to echo horns. I made the head very triangular, much like an adder, but not flat. more of a wedge really. It became more dragon than snake. I gave it a forked tongue. I intend to add some shards along the spine too.

 I began adding some shards to emphasise the angle of the head as the body is pierced and to echo horns. I made the head very triangular, much like an adder, but not flat. more of a wedge really. It became more dragon than snake. I gave it a forked tongue. I intend to add some shards along the spine too.
I left it here for a couple of days while I returned to the wings. The more I looked at it, the more I could see I needed to change the curve of the upper body. I didn't like it being so straight. It also needed thickening as it neared the head. I added layers of paper clay, then decided to sand some off the underside.

To get the curve I wanted, I had to take the underside right back and sand away some of the armature foil. I took away as much as I could before I hit the armature wire, but it was enough. A layer of paper clay was smoothed over the exposed foil and more to the body too.

Happy with the body curve, I returned to the head features. The head was modelled flat at the sides when I had in mind more of a snake head, which would be a similar width to the body it emerges from. Now, with more of a dragon head in mind, I added some volume to the sides. The next question is teeth or no teeth? I'll leave that for now... what I have decided is to add some spikes along the back starting at the head. I can't quite decide exactly how I want them to look so I'll just do some and see what I think. The first thing to do is to cut a groove out of the body down the back. This will help the new paper clay get a good grip on the body. I did this using my Dremel and a cutting disc. I makes very light work. Then I rolled out some smooth air dry clay between sheets of clingfilm and inserted the edge into the groove which had been prepped with PVA, and left it to dry overnight. The next day, I cut away the excess with the Dremel until I was left with spikes along the back. I wanted them to echo the spikes on the head.

Quite good, but not exactly what I want, so I adjusted them...

Better, but still not right. However, now I could see what I needed to do, so I filled in the gaps with more clay, taking me back to the beginning, and left it to dry overnight again. You might think it was a day's work wasted, but that is not the case at all. Given that I had no clear idea of what I wanted, it was time well spent. I know exactly what I want now. I am never afraid to scrap what I have done if I am not happy with the result. I must be completely satisfied or it will irritate me every time I look at the sculpture and that would not do. It would drive me mad! It took me another two attempts to get what I wanted, but I'm happy now.
The wings gave me considerable problems. I had decided to make them more 'feathery' than those of Raphael but not with actual feathers. I began by putting a thin layer of paper clay front and back to provide a stiff surface for the following layers of air dry paper clay.


Quite good, but not exactly what I want, so I adjusted them...

Better, but still not right. However, now I could see what I needed to do, so I filled in the gaps with more clay, taking me back to the beginning, and left it to dry overnight again. You might think it was a day's work wasted, but that is not the case at all. Given that I had no clear idea of what I wanted, it was time well spent. I know exactly what I want now. I am never afraid to scrap what I have done if I am not happy with the result. I must be completely satisfied or it will irritate me every time I look at the sculpture and that would not do. It would drive me mad! It took me another two attempts to get what I wanted, but I'm happy now.

The wings gave me considerable problems. I had decided to make them more 'feathery' than those of Raphael but not with actual feathers. I began by putting a thin layer of paper clay front and back to provide a stiff surface for the following layers of air dry paper clay.

I started adding layers, at first, creating angled shapes to indicate feathers.


I wasn't quite happy and changed the build of each feather so that the main part was flatter with the angle being at the top of each feather.

Then I added the next layer.
Two more layers were added to finish the effect. By now, the weight of the clay was pulling the wings down from the intended position, but I had not fixed them to the back yet, so it didn't matter. It was very useful to be able to move the wings around for sanding and modelling of the body and hair. When I did eventually fix them, I supported the top tips with masking tape wrapped around and left them for a couple of days. I made the mistake of removing the support before the clay had dried and over the next few days, the wings must have drooped without me noticing. I eventually had to ease the wings back up into position which cracked the connections to the body. These had to be cut away and re-built. I left the tape on until the clay was very dry, which took about a week.

Meanwhile, there were just a few minor alterations I wanted to make before I added the spear and hands, which would make access to some parts difficult. I had to be sure I had finished the rest before these elements were added. There were a couple of feathers I had added earlier that I wanted to remove and the tail end of the serpent needed thinning. After the best part of a day sanding everything smooth, I made the alterations necessary and repaired as required. The following day should be the last. I really hoped so as , by now, I was beginning to flag. My creative energy was very low. I was very tired. Almost exhausted.


Here you can see the alteration made to the wing, removing the extra feather. The same was done to both wings.


The hands were roughly shaped using smooth air dry clay before being finished with decorator's filler the next day.

The spear was fashioned from a piece of metal taken from an old shopping trolley frame. I knew the metal would be useful! There was a kink in it which I couldn't quite straighten, but it fell just where the top hand is and is nicely hidden. The spearhead was made from folded tin foil cut to shape then covered in air dry paper clay, and sanded when dry. It is glued to the rod using PVA and partially inserted into the serpent body making a firm connection. If knocked, it should be fine.
Here are some close-ups of various features of the finished sculpture which is now drying and waiting to be painted. I am delighted with the result of all my labour. It works for me. The plaster base was carved to look like rock, well that's the idea.


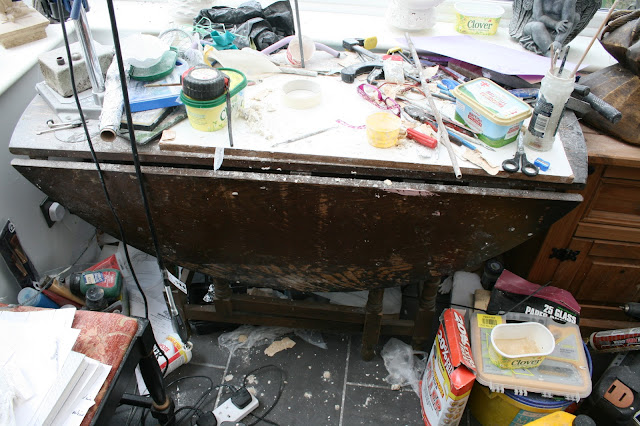
The Aftermath!


Meanwhile, there were just a few minor alterations I wanted to make before I added the spear and hands, which would make access to some parts difficult. I had to be sure I had finished the rest before these elements were added. There were a couple of feathers I had added earlier that I wanted to remove and the tail end of the serpent needed thinning. After the best part of a day sanding everything smooth, I made the alterations necessary and repaired as required. The following day should be the last. I really hoped so as , by now, I was beginning to flag. My creative energy was very low. I was very tired. Almost exhausted.


Here you can see the alteration made to the wing, removing the extra feather. The same was done to both wings.

The hands were roughly shaped using smooth air dry clay before being finished with decorator's filler the next day.

The spear was fashioned from a piece of metal taken from an old shopping trolley frame. I knew the metal would be useful! There was a kink in it which I couldn't quite straighten, but it fell just where the top hand is and is nicely hidden. The spearhead was made from folded tin foil cut to shape then covered in air dry paper clay, and sanded when dry. It is glued to the rod using PVA and partially inserted into the serpent body making a firm connection. If knocked, it should be fine.
Here are some close-ups of various features of the finished sculpture which is now drying and waiting to be painted. I am delighted with the result of all my labour. It works for me. The plaster base was carved to look like rock, well that's the idea.


The Aftermath!

Michael Painted


