For years I have been intending to sculpt a St. Michael. It has been in the back of my mind. A constant thought. Other projects got in the way and I wasn't ready. This year, I re-visited the idea and it began to take a more solid shape in my mind's eye. I did plan to make a large outdoor sculpture for the front drive and with that in mind, the ideas started to develop. St. Michael became St. Michael and St Raphael after my husband's illness. Raphael is the healer, of course. I decided to start with smaller sculptures, possibly to be used as maquettes for larger ones in the future. The project began with armatures and basic modelling for both. I cannot work on two things at once, however. How can I really focus on the attributes of more than one entity at a time? Raphael was calling to me and so I have concentrated on him first. Of course, with the advent of Coronavirus, the world is in dire need of a manifestation of Archangel Raphael.
I wanted to convey Raphael during manifestation. Not quite solid. Constantly in motion. Shimmering, swirling energy. Not human, yet recognisable in form. If an Archangel appeared, I imagine he would look familiar. Not a scary, alien thing. I wanted wings and a beautiful visage. Something Pre-Raphaelite. Flowing hair. Perhaps a crown. With all this in mind Raphael began to take shape.
I shall take you through the journey from start to finish. Let's begin.

I can't draw. I'm pretty hopeless at putting my ideas down on paper, as you can see from this basic sketch which was my starting point. I had a rough idea of scale and shape and made notes of measurements for height, wingspan etc. These would apply to Raphael and Michael as I want them to be a complimentary pair. I also had to decide on the medium for the execution of the sculpture. I love working with wet clay but liked the idea of direct modelling for this project, rather than making a mould and casting. The wings would make this very difficult. I wanted the point the sculpture fixes to the base to be as small as possible so the top-heavy design demanded a lightweight medium. I opted for papier mache and paper clay with a plaster base for weight. I didn't want the base to be too dominant or a separate entity either.


 The picture on the left is the basic wire armature for Michael with the arms roughly in position. The wing armatures were made separately and taped on to the body wires. I drew the basic wing shape onto paper and used it as a template to bend 2mm garden wire into four wings. The 'feathers' were added to the armature after it had been taped onto the body wires using a thinner 1.2mm garden wire. I secured the overlapping wires with strips of masking tape. Then the basic body shape was formed using tin foil. Both archangels were given the same wings and are the same height. It is an interesting process. The body shape is easily achieved. I was conscious of the need to keep the bulk of foil less then I wanted the finished shape to allow for the paper clay layers. I found this challenging since I am used to working in clay. My natural instinct was to build it up to the finished size. Another discipline being learned!

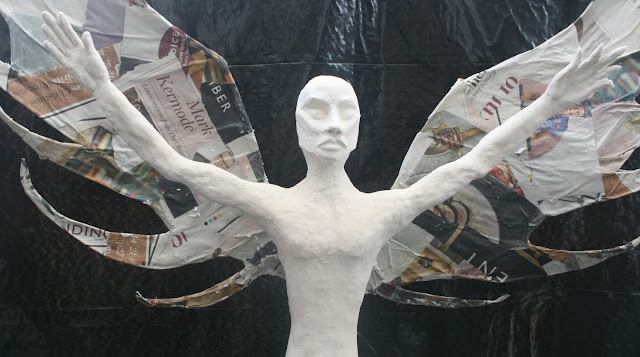
 The wings were covered with a layer of paper strips pasted front and back and a thin coat of paper clay smoothed over the body. When that had dried, I started to build up the muscles and refine the shape. At this stage, the wings are still flexible enough to bend. The paper layer has plenty of 'give' so I was able to put a curve into the wings and play with the bend of the feathers.
The beauty of paper clay is that it sets rock hard when dry and is strong but very lightweight. It also sticks to itself even though previous layers might be dry so alterations can easily be made at any point from start to finish. There is no time limit. Another excellent quality is that because the clay is thinly layered over foil, it is easily sawn or cut through. I needed to reduce the length of the arms, especially when I had made the hand armature. I wasn't over bothered about accurate scale. I was not modelling a human, and I quite like them a little long, but not ridiculously so. I also needed to pare the arms back so I could bind the hand armatures to the arm wire.
 The arm was stripped back enough to allow me to bind the hand on and the arm wire goes most of the way along the middle finger. a good, strong connection.
Before I got to this stage though, I had different ides of what I would do about the hands. Perhaps just merging them into the wings. No hands at all or feather fingers. I decided to have proper 'healing' hands as Raphael is the healer. I could always change my mind. Once the armatures were fixed, I left the hands and moved to the face.
Raphael's face was very important to me. I wanted a beautiful but masculine visage. Something a little Pre-Raphaelite, perhaps. I wasn't sure I could achieve it and without too much detail in mind, just started modelling. The head already had a layer of paper clay which had set hard providing a solid base to build on. I began building the planes using powdered decorator's filler mixed to a stiff paste. I have used it to re-build fingers on statue restorations and find it easy to manipulate. It can be smoothed as it is setting using a brush and water and shaped with tools or paintbrushes. Finally, it can be sanded to shape and smoothed as necessary. Don't laugh when you see the images. It turned out alright in the end!


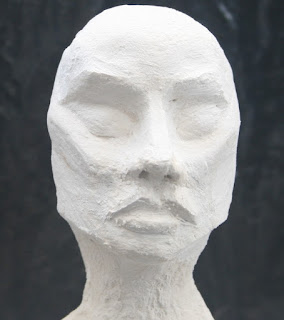
When I came to do the eyes and filled the socket with a rough shape, I really liked the effect. The whole idea behind Raphael was one of manifestation, not fully formed and non-human. I wasn't putting in too much detail anywhere, so no eyelids was in keeping. I did put temporary ears on, but that was mainly to help with the hairline. They were covered eventually.


It just wouldn't hold for some reason. Raphael seemed to be swaying from the inside. I think the previous swaying before I attempted the fix created a cavity between the armature wires and the foil surrounding them. I made several attempts to fix it. Both Michael and Raphael were made the same way regarding the basic body and base. I had tried to keep the base as small as possible but that did mean they were a little prone to toppling if knocked. They were fine otherwise, but as the wings gained more weight it became more of a problem.
I decided I would have to reinforce the inner armature and widen the base on both. Michael was still in his basic form and this was not a problem, but Raphael was quite advanced at this point. I knew what I had to do, I just wasn't looking forward to doing it. I operated on Michael first, as practice and used the same technique on Raphael.


I can't draw. I'm pretty hopeless at putting my ideas down on paper, as you can see from this basic sketch which was my starting point. I had a rough idea of scale and shape and made notes of measurements for height, wingspan etc. These would apply to Raphael and Michael as I want them to be a complimentary pair. I also had to decide on the medium for the execution of the sculpture. I love working with wet clay but liked the idea of direct modelling for this project, rather than making a mould and casting. The wings would make this very difficult. I wanted the point the sculpture fixes to the base to be as small as possible so the top-heavy design demanded a lightweight medium. I opted for papier mache and paper clay with a plaster base for weight. I didn't want the base to be too dominant or a separate entity either.


I eventually decided to cast plaster in a small pudding basin with a hole in the centre in which to fix the armature wires. I chose the smallest size I thought I could get away with and cast one each for Raphael and Michael so they are the same. It is just as well I did as I have since managed to break the pudding basin and couldn't cast another if I wanted to. The armature for each was made from lengths of galvanised garden wire bound together and the ends bent for better fixing in the plaster. Luckily, casting plaster sets quickly so it was possible to hold the wires in position until it was firm enough.

 The picture on the left is the basic wire armature for Michael with the arms roughly in position. The wing armatures were made separately and taped on to the body wires. I drew the basic wing shape onto paper and used it as a template to bend 2mm garden wire into four wings. The 'feathers' were added to the armature after it had been taped onto the body wires using a thinner 1.2mm garden wire. I secured the overlapping wires with strips of masking tape. Then the basic body shape was formed using tin foil. Both archangels were given the same wings and are the same height. It is an interesting process. The body shape is easily achieved. I was conscious of the need to keep the bulk of foil less then I wanted the finished shape to allow for the paper clay layers. I found this challenging since I am used to working in clay. My natural instinct was to build it up to the finished size. Another discipline being learned!

The beauty of paper clay is that it sets rock hard when dry and is strong but very lightweight. It also sticks to itself even though previous layers might be dry so alterations can easily be made at any point from start to finish. There is no time limit. Another excellent quality is that because the clay is thinly layered over foil, it is easily sawn or cut through. I needed to reduce the length of the arms, especially when I had made the hand armature. I wasn't over bothered about accurate scale. I was not modelling a human, and I quite like them a little long, but not ridiculously so. I also needed to pare the arms back so I could bind the hand armatures to the arm wire.

Before I got to this stage though, I had different ides of what I would do about the hands. Perhaps just merging them into the wings. No hands at all or feather fingers. I decided to have proper 'healing' hands as Raphael is the healer. I could always change my mind. Once the armatures were fixed, I left the hands and moved to the face.
Raphael's face was very important to me. I wanted a beautiful but masculine visage. Something a little Pre-Raphaelite, perhaps. I wasn't sure I could achieve it and without too much detail in mind, just started modelling. The head already had a layer of paper clay which had set hard providing a solid base to build on. I began building the planes using powdered decorator's filler mixed to a stiff paste. I have used it to re-build fingers on statue restorations and find it easy to manipulate. It can be smoothed as it is setting using a brush and water and shaped with tools or paintbrushes. Finally, it can be sanded to shape and smoothed as necessary. Don't laugh when you see the images. It turned out alright in the end!


When I came to do the eyes and filled the socket with a rough shape, I really liked the effect. The whole idea behind Raphael was one of manifestation, not fully formed and non-human. I wasn't putting in too much detail anywhere, so no eyelids was in keeping. I did put temporary ears on, but that was mainly to help with the hairline. They were covered eventually.
Raphael was beginning to take shape.

I returned to the hands. I modelled them directly onto the wire armature using Jonni's smooth air dry clay recipe. I made them a little chunky with the intention of carving and sanding them to shape.


They didn't look right. They were too 'human'. Too earth-bound. I put my arms up in the same pose as Raphael and imagined hands being formed. Moving. Fingers in motion. Not fingers? A suggestion of fingers? Perhaps even turning into feathers? Part of the wing? I altered one of the hands and took a good look at both. Which worked? I took a couple of days to keep looking and thinking . I'm sure you can guess which I liked. It was very easy to alter the hands using Silky-Smooth Air Dry Clay I just added a blob to the top of each finger and teased out the shape. Both the paper clay recipes work very well together. They adhere to each other without the need for glue and can be manipulated and smoothed using water and modelling tools or a paintbrush. They can be carved and sanded too. The more I work with them, the more I enjoy them. They are very versatile and very light-weight. The following picture shows both hand forms and I left Raphael at this stage to keep looking and comparing before I finally decided which way to go.

Hands done, I went back to the head. Hair is what was needed. I can't really get a proper idea if the face works when there is no hair on the head. I had an idea of the effect I wanted to achieve with the hair. After the way the rest was developing, I didn't want to imitate human hair either. I wanted it to reflect the swirling feeling of manifestation. Also, to echo a feature yet to be discussed. The easiest way was to start pinning shaped foil onto the head and to play around with it. Over several days, I experimented with the shapes, taking time to look at it from a distance.

This is the first effort. I quite liked it but thought it a little reminiscent of the Statue of Liberty. the hair looked too much like a crown.

I removed the foil and started again. I wanted more movement and a suggestion of hair swirling in different directions, weightless. Strands moving into twisting around each other. At this stage, I drilled holes in the head and inserted thin garden wire as support. I was confident I was getting there and the wires allowed me to bend and twist the strands into more extreme shapes.

At this stage, I thought I had the look I wanted and started adding paper clay After all the experimentation, the foil was a bit messy but the clay soon smooths it all over. As always, I took time to look at the overall shapes created from a distance and the hair went through a few more stages before I was finally happy.

I thought the top twist looked too much like a Unicorn Horn and was too tall so I adjusted it to make it smaller and to echo the aforementioned feature. I still wasn't quite happy though. The two side strands sticking out weren't right. and the top twist was too rounded, unlike the other strands.

I pulled the side strands in and flattened the top twist. Finally, I was happy.
Raphael was really becoming something special. He was nothing like anything I could have imagined at the beginning and not at all in a style I would consider mine. However, I loved everything about him. I wanted to get all the elements roughed-out to get a feel for the whole, so I moved on to the next feature.

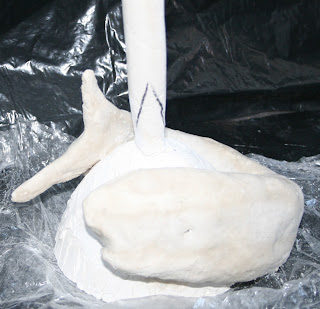
The fish armature was made from a basic fish shape of garden wire covered with foil and masking tape. I bent it around the base and fixed it in position with a couple of screws, one through the head and one through the tail.

The fish was then covered with a layer of air-dry paper clay which was smoothed and left to dry. It dries very hard and can be added to at any time, wet or dry. Dips and dents can be filled with a blob of the same and smoothed using water and modelling tools, my favourite of which is my finger! I am very hands-on and if I can get away with it, always use my own fingers to model with. Barrier cream is a good idea as these paper clays have decorator's filler in the mix which is an irritant. I just like to 'feel' what I am doing. I have tried using latex gloves, but it's no good. Basic fish done, back to the wings.

I had to make a decision about the wings. The time had come. Should they be independent of the arms, or should the arms attach to the wings? Should they have feathers or be plain? Did I like the position? This could be altered if necessary. Ummm.

Here you can see the papered wing shape as originally made. When I came to map out where feathers would lie, I realised some of the shaping was wrong. I needed to create more space between some of the feathers. Luckily, this was easily done. The thin garden wire used to make the feather shapes over the main armature wire was easily cut through with wire cutters and the fact that the whole wing was covered in paper strips and paste meant everything held together even though wires were cut away. This enabled me to create longer tips adding space.

I further tweaked the tips and curved the wings and tips to add movement. Again, I held my arms up, while looking at the wing shape and wiggled my fingers imagining them manifesting. Yes, I liked what I saw. The decision was made to merge the hands into the wings to make them part of them rather than apart from them. I had earlier considered not having arms at all, just wings, but Raphael needed his healing hands. I gave the wings a thin coat of paper clay and while it was still wet, pinned the wings to the hands from the back using horseshoe staples and a staple gun. To take the strain away until they had dried, I taped them together. When the wings were dry, they were very strong and provided a stable base to add the feathers. I experimented with air dry clay making feathers to add to the wings. I thought I would model them first then stick them to the wing using PVA glue.

I stuck a few on and decided I didn't like them. I didn't want feathers after all. I was trying to avoid details which limited the other-worldly nature of Raphael. Looking at the wings, they had taken on a flame-like quality. I wanted something a little ambiguous. Are the wings feathers or flames? I added a smooth layer of air dry clay over the front of the wings and left it to dry. I liked the simple smoothness. I still wanted layers though so I added more 'feathers' using paper clay. I chose the softer clay as I could put it on with a knife and shape it in situ as I felt. The second layer went on and I was very happy with the effect. Things were really developing well.
One afternoon, I returned to the sun-lounge studio to find Raphael had tumbled off the table and had fallen head first into the seat of my chair. He hadn't hit the floor. The cat looked a bit guilty, but he is usually so good. I wasn't convinced he has caused the tumble. He had been asleep on the chair Raphael fell onto and the fright might explain his look. I had found young Pigeons flapping around in a panic the day before having waddled in and being unable to find their way out again. I think this the most likely explanation. There was some damage to his right arm and both wings. Cracks. The armature wire had prevented any complete breaks so a little repair work needed but nothing major. Or so I thought.


Upon closer inspection I discovered Raphael had broken his connection to the base. There were armature wires running through, but the paper clay layer has cracked and Raphael was swaying. As I worked on the wing repairs, Raphael swayed more and more. I tried to re-attach the base, cutting away some clay and filling the gap with fresh plaster. I took the plaster up the body and over the base to try to make a strong repair. I was intending to sand it down later.


Upon closer inspection I discovered Raphael had broken his connection to the base. There were armature wires running through, but the paper clay layer has cracked and Raphael was swaying. As I worked on the wing repairs, Raphael swayed more and more. I tried to re-attach the base, cutting away some clay and filling the gap with fresh plaster. I took the plaster up the body and over the base to try to make a strong repair. I was intending to sand it down later.

It just wouldn't hold for some reason. Raphael seemed to be swaying from the inside. I think the previous swaying before I attempted the fix created a cavity between the armature wires and the foil surrounding them. I made several attempts to fix it. Both Michael and Raphael were made the same way regarding the basic body and base. I had tried to keep the base as small as possible but that did mean they were a little prone to toppling if knocked. They were fine otherwise, but as the wings gained more weight it became more of a problem.
I decided I would have to reinforce the inner armature and widen the base on both. Michael was still in his basic form and this was not a problem, but Raphael was quite advanced at this point. I knew what I had to do, I just wasn't looking forward to doing it. I operated on Michael first, as practice and used the same technique on Raphael.

I found a basin that would more or less continue from the original base and filled it to a level with the same diameter as the bottom diameter of the original base with shingle with a tube inserted to leave a hole in the centre. I placed a circle of cardboard on top and covered it all over with clingfilm then cast plaster filled with shingle for extra weight. This was probably overkill, but I didn't want to risk it being too light and it wasn't much wider than the original. I still wanted to keep the base as small as possible.


I happened to have a steel rod from a garden lantern never used, so I cut two lengths from it and attached bent wires for hold when it was inserted into the base. I didn't want the rods pulling out.
I repaired the damage to the arm and wings and left it to dry while I reinforced Michael and got some practice for what was to follow. I took a deep breath...

I cut through the armature wires level with the top of the base and laid Raphael down on a foam cushion. I had to cut around the wire stubs left in the base to remove them. This was a simple task using my Dremel multitool and a cutting drill bit. The plaster was dry and cut easily. The Dremel also came in handy for the next part of the operation. I had to cut through Raphael's body from the bottom to his waist and remove the shell from the armature wires.

I removed the inner foil which had originally formed the body shape and taped the new steel rod to the armature wires.

I soaked both base parts thoroughly in water and placed the old base onto the new extension, lining up the holes, on a piece of cling film. A good strong mix of casting plaster was then poured into the hole and Raphael, taped to the new steel rod was placed into the hole and held until set. There was enough time to slightly adjust the rods so they were upright using a spirit level. Luckily, casting plaster sets firm enough very quickly, so I wasn't stuck holding it in position for more than a few minutes. The runny plaster seeped into the gaps between the two base parts sticking them together.

Rather than stuff the body cavities with foil, I just layered on hot glue until the two halves could stick to the steel rod whilst matching up. I taped and clamped the body overnight to allow it to set hard and added a coat of paper clay to the exposed rod. I had removed the bottom few inches of the body shell as there wasn't space to allow the new steel rod to fit and match up the body halves. I had wanted the minimal of body at the base and had moulded the shell closely around the armature wires. Once the wires had the reinforcing rod taped on, the bottom of the body shell just wouldn't fit together, I could achieve a much smaller bottom if I moulded straight onto the new rod. The next day, the sides were filled with paper clay and the waist join was repaired. I did have to grind away some of the old body to create a gap big enough to fill with fresh wet paper clay to make a strong join. The whole was taped together and clamped to set overnight again.

By the time I had finished, there was no telling of the major operation Raphael had endured. He had a strong armature rod running through him and a new, heavier, slightly wider base. Everything he should have had from the beginning. We live and learn. I finished the wings and sanded everything down.

I thought long and hard about the back of the wings. In my original concept, I had imagined wings feathered front and back. Traditional. Raphael had developed rather differently though and I wasn't sure if I wanted to replicate the front effect on the back. In the end, I opted for a smooth, un-embellished rear and made a feature of how the wings emerged from the body.


I am very pleased with the way the rear looks.
Next, the feature I have mentioned previously but not given any clue to...
A symbol associated with healing is the Caduceus. It is widely used and recognised. I have read arguments that it should really be the Rod of Asclepius not the Caduceus of Hermes but the wings of Raphael and everything else lends itself more to the Caduceus. Here are the pictures that inspired me.


Raphael as Caduceus is the sculpture I wanted to create. The serpents form a double helix, which is related to DNA and nature. What could be more apt? That is why I wanted the hair flowing around the head, to echo the flow of the serpents around the body. The next stage, therefore, was to position the serpents. I started off with two length of garden wire and covered them with masking tape to make a pair of slender serpents. I wasn't exactly sure where I wanted the serpents to finish. I thought I would have them wrapped tightly around Raphael's body. That was how I originally imagined them so I drilled holes in the base and poked the wires in then began winding them around the body. It was just a rough wind to get an idea.


I experimented with the position of the heads. Did the wings distract from the serpents when they were higher, under the arms? Should I finish them at the waist, before the wings? I bent the wires over to see.. I found it a little distracting with the extra wire dangling so I processed the picture on my laptop and roughly painted out the excess.

It didn't take me long to decide which way to go and I set about winding the serpents around correctly. I was satisfied the wires were more than long enough. I didn't want to get to the top and realise they were too short! At some point before this, I had decided to have the serpents away from the body at the sides rather than up against it. With this in mind, I used a pencil during the winding process to leave a gap at the sides. I put the pencil against the body then wound the wire around it each side, fixing the wire to the body front and back with a nail staple. After looking at it from a distance, I realised the gaps weren't big enough and by the time the wires were covered with a layer of paper clay, the gaps would be gone. I repeated the process the next day and also measured the space between each cross-over place to even it up. This time I fixed the positions with a horseshoe staple as the nail staples kept popping out. I also inserted a thin lolly stick as behind the wires where they crossed the body to allow for a layer of paper clay. I wanted round not semi-circle shaped serpents! I worked from the bottom up, smoothing a layer of paper clay around the wires. I had already made the snakes tapered using the masking tape, so a uniform layer of clay was all that was needed. When I reached the waist, I stopped adding clay and took a couple of days to decide about the heads. I wasn't quite happy about their position.

I had already cut off the heads. Once the serpents were correctly pinned to the body, they were too long. there was too much excess to shape. After some more experimentation bending the wires this way and that, I cut some more off the ends. I didn't like them looking into the armpits and turned the heads outwards. Finally, I was happy. The wires were covered with paper clay and the heads shaped. I made a conscious decision to keep the snake heads simple with little detail, in keeping with the rest of the sculpture. The snakes were sanded until smooth. There was a little adjustment of thickness to make here and there which involved adding more clay, leaving to dry and sanding again. It is quite a slow process. However, I was very happy with the final serpents.

All that remained was to model the detail on the fish and finish the base. I used decorator's filler to mask the join between the two base layers and brushed blobs of leftover paste into little ripples with water all around the base. Raphael is emerging out of the sea.

Details were added to the fish using Smooth Air Dry Paper Clay. The fins were cut into shape when the clay was dry. A final sanding to make everything smooth and Raphael was fully modelled and left to dry while Michael was made. The paint job is yet to be attempted as I write this and will be a project in itself.
I am delighted with the finished work. Every detail has been carefully thought out and executed to the best of my ability. I have amazed myself. I love my sculpture of Archangel Raphael. Now, to Michael....


I repaired the damage to the arm and wings and left it to dry while I reinforced Michael and got some practice for what was to follow. I took a deep breath...

I cut through the armature wires level with the top of the base and laid Raphael down on a foam cushion. I had to cut around the wire stubs left in the base to remove them. This was a simple task using my Dremel multitool and a cutting drill bit. The plaster was dry and cut easily. The Dremel also came in handy for the next part of the operation. I had to cut through Raphael's body from the bottom to his waist and remove the shell from the armature wires.

I removed the inner foil which had originally formed the body shape and taped the new steel rod to the armature wires.

I soaked both base parts thoroughly in water and placed the old base onto the new extension, lining up the holes, on a piece of cling film. A good strong mix of casting plaster was then poured into the hole and Raphael, taped to the new steel rod was placed into the hole and held until set. There was enough time to slightly adjust the rods so they were upright using a spirit level. Luckily, casting plaster sets firm enough very quickly, so I wasn't stuck holding it in position for more than a few minutes. The runny plaster seeped into the gaps between the two base parts sticking them together.

Rather than stuff the body cavities with foil, I just layered on hot glue until the two halves could stick to the steel rod whilst matching up. I taped and clamped the body overnight to allow it to set hard and added a coat of paper clay to the exposed rod. I had removed the bottom few inches of the body shell as there wasn't space to allow the new steel rod to fit and match up the body halves. I had wanted the minimal of body at the base and had moulded the shell closely around the armature wires. Once the wires had the reinforcing rod taped on, the bottom of the body shell just wouldn't fit together, I could achieve a much smaller bottom if I moulded straight onto the new rod. The next day, the sides were filled with paper clay and the waist join was repaired. I did have to grind away some of the old body to create a gap big enough to fill with fresh wet paper clay to make a strong join. The whole was taped together and clamped to set overnight again.

By the time I had finished, there was no telling of the major operation Raphael had endured. He had a strong armature rod running through him and a new, heavier, slightly wider base. Everything he should have had from the beginning. We live and learn. I finished the wings and sanded everything down.

I thought long and hard about the back of the wings. In my original concept, I had imagined wings feathered front and back. Traditional. Raphael had developed rather differently though and I wasn't sure if I wanted to replicate the front effect on the back. In the end, I opted for a smooth, un-embellished rear and made a feature of how the wings emerged from the body.
From this,
To this.


I am very pleased with the way the rear looks.
Next, the feature I have mentioned previously but not given any clue to...
A symbol associated with healing is the Caduceus. It is widely used and recognised. I have read arguments that it should really be the Rod of Asclepius not the Caduceus of Hermes but the wings of Raphael and everything else lends itself more to the Caduceus. Here are the pictures that inspired me.

Raphael as Caduceus is the sculpture I wanted to create. The serpents form a double helix, which is related to DNA and nature. What could be more apt? That is why I wanted the hair flowing around the head, to echo the flow of the serpents around the body. The next stage, therefore, was to position the serpents. I started off with two length of garden wire and covered them with masking tape to make a pair of slender serpents. I wasn't exactly sure where I wanted the serpents to finish. I thought I would have them wrapped tightly around Raphael's body. That was how I originally imagined them so I drilled holes in the base and poked the wires in then began winding them around the body. It was just a rough wind to get an idea.


I experimented with the position of the heads. Did the wings distract from the serpents when they were higher, under the arms? Should I finish them at the waist, before the wings? I bent the wires over to see.. I found it a little distracting with the extra wire dangling so I processed the picture on my laptop and roughly painted out the excess.

It didn't take me long to decide which way to go and I set about winding the serpents around correctly. I was satisfied the wires were more than long enough. I didn't want to get to the top and realise they were too short! At some point before this, I had decided to have the serpents away from the body at the sides rather than up against it. With this in mind, I used a pencil during the winding process to leave a gap at the sides. I put the pencil against the body then wound the wire around it each side, fixing the wire to the body front and back with a nail staple. After looking at it from a distance, I realised the gaps weren't big enough and by the time the wires were covered with a layer of paper clay, the gaps would be gone. I repeated the process the next day and also measured the space between each cross-over place to even it up. This time I fixed the positions with a horseshoe staple as the nail staples kept popping out. I also inserted a thin lolly stick as behind the wires where they crossed the body to allow for a layer of paper clay. I wanted round not semi-circle shaped serpents! I worked from the bottom up, smoothing a layer of paper clay around the wires. I had already made the snakes tapered using the masking tape, so a uniform layer of clay was all that was needed. When I reached the waist, I stopped adding clay and took a couple of days to decide about the heads. I wasn't quite happy about their position.

I had already cut off the heads. Once the serpents were correctly pinned to the body, they were too long. there was too much excess to shape. After some more experimentation bending the wires this way and that, I cut some more off the ends. I didn't like them looking into the armpits and turned the heads outwards. Finally, I was happy. The wires were covered with paper clay and the heads shaped. I made a conscious decision to keep the snake heads simple with little detail, in keeping with the rest of the sculpture. The snakes were sanded until smooth. There was a little adjustment of thickness to make here and there which involved adding more clay, leaving to dry and sanding again. It is quite a slow process. However, I was very happy with the final serpents.

All that remained was to model the detail on the fish and finish the base. I used decorator's filler to mask the join between the two base layers and brushed blobs of leftover paste into little ripples with water all around the base. Raphael is emerging out of the sea.

Details were added to the fish using Smooth Air Dry Paper Clay. The fins were cut into shape when the clay was dry. A final sanding to make everything smooth and Raphael was fully modelled and left to dry while Michael was made. The paint job is yet to be attempted as I write this and will be a project in itself.
I am delighted with the finished work. Every detail has been carefully thought out and executed to the best of my ability. I have amazed myself. I love my sculpture of Archangel Raphael. Now, to Michael....


Raphael Painted


No comments:
Post a Comment
Comments and questions welcome.