

I fell in love with this beautiful Victorian statue the minute I saw it. Unfortunately, its lower arms and hands were missing and I wasn't too sure if I was up to the task of replacing them. I had a little think about it for a while. I couldn't get the exquisite face out of my head and the next time I saw it, I couldn't resist. I had looked at images of removable hands on statues on the internet and thought I could probably do equally well. Hands are notoriously difficult to model and apart from the small repair to the hand on St. Joseph, I had never modelled hands before. I started to get excited about the challenge. It is all about frame of mind. When I first saw the it, I wasn't in the right frame, obviously, because I left it behind. A couple of weeks later, it's a different story. Also, I had only just completed my kitchen ceiling project and was creatively drained. I needed those weeks to recover myself. Now I wonder how I could have been so stupid as to risk someone else buying it. I would have kicked myself if I had lost out. However, no-one else did buy it. Perhaps it was just meant for me.
Originally, I had thought I could match the paint colours and touch it up where necessary. I didn't think the paintwork was too bad. Upon close inspection, in the good light of my sun-lounge studio, I could see rather more work was needed. There was extensive damp damage and even where paint had not already flaked off, it was about to. A light sanding to smooth flaked areas down brought off more and more flakes. I must admit, I was a little disheartened. I probably let out a sigh too. Or was it a groan? I remembered the messy nightmare of stripping down the St Joseph using paint stripper. Did I really want to go through that again? NO, I did not. The most pressing matter was to get the hands modelled. They would be cast in plaster and would need time to dry out thoroughly before painting, so I put the flaking paint to one side for the time being to concentrate on something more enjoyable. A new challenge. There was some damage to the sleeves where the hands would slot in, so I set about repairing them first.

To keep the original shape inside, I rolled a piece of plastic, cut from a kitchen food chopping mat, and placed it inside the cavity.
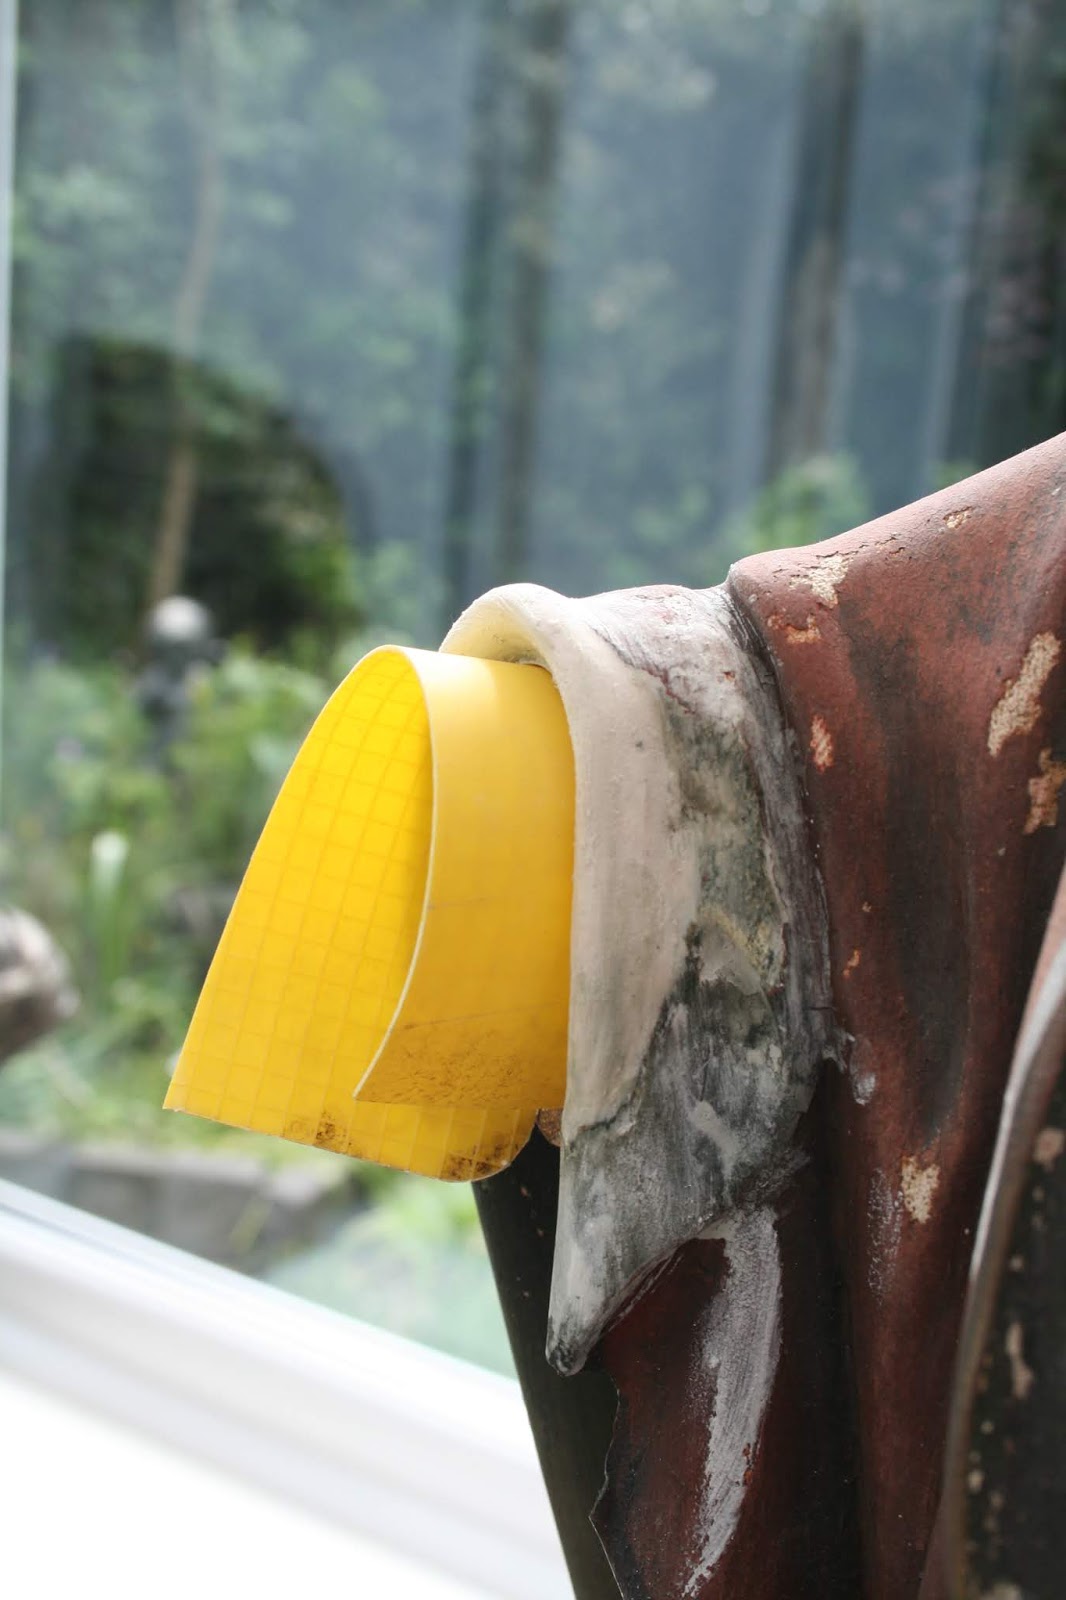
The repair was made with good old decorator's filler. I mix the dried powder to a putty-like consistency which is easily sculptable . To reduce the amount of sanding necessary,a damp paintbrush is the perfect tool to refine the shape and smooth the surface.
.

Both sleeves were repaired in this way and while I was at it, I repaired other parts of the drapery which had pieces missing, although, given the age of the statue, they were very few.
The Hands


It was important to sort out the position and length of the arms and the scale of the hands. I followed the line of the cavity to determine the position, after all, the arms wouldn't suddenly change angle below the point of the elbow. I used some pipe insulation foam and made 'hands' from tin foil to show the size and position, manipulating them until I was satisfied.

I started the hands off by making 'sausages' for the fingers, blending together at the palm and then adding a piece for the thumb at an angle. I had a wire running through the middle to support the wrist, which would be too thin to support the weight of the hand alone.


I used my own hands to model from, constantly observing lengths, joints etc. It was rather a slow process over several days, as I hadn't modelled hands before.


I kept adding small balls of clay to build up the knuckles, joints, pads on the fingers etc.


I continued to manipulate the clay until I was happy. At first, the fingers were rather splayed, but by the time I had finished, they were closer together although still very much individual fingers. I experimented with moving the fingers to create movement in the hand.

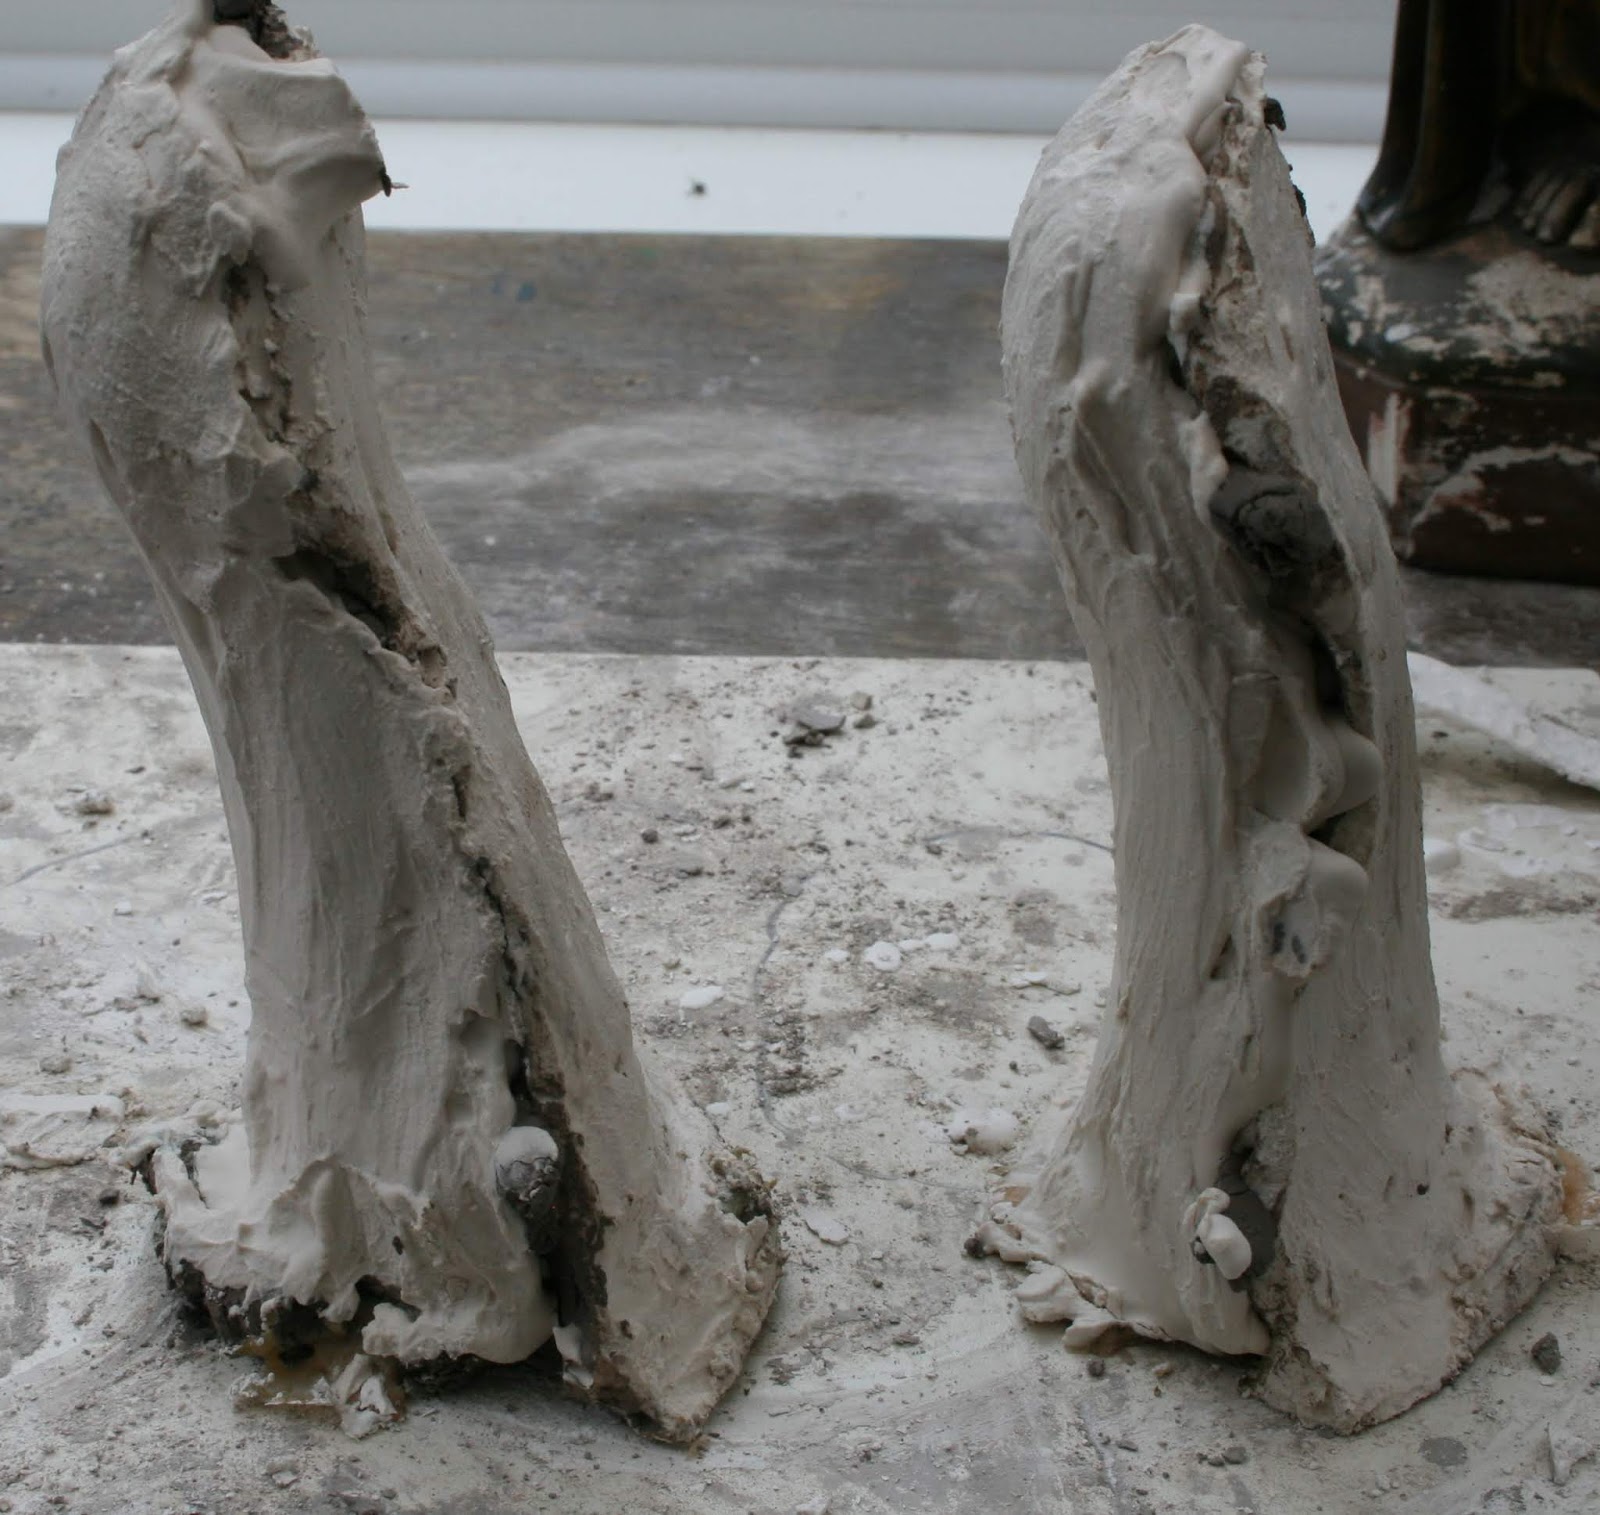
The sleeves were made separately to the hands. I pushed soft clay into the arm cavities which I has lined with cling-film, and secured them in position with wires through the original holes in the robes. This is how the original arms would have been secured to the statue.


Once secured, I built-up the sleeves to the required length and fashioned the garment folds. The wired hands were then pushed into place and the joins 'stuck' with clay wash. They were left overnight to dry out a little. The next day, I started to make the mould. The hands were removed from the cavities and stuck to a flat base of clay

Although the hands were made for this specific statue, and I only needed one pair to be cast, I decided to used Latex Rubber with a 'mother' mould . I was afraid of shattering the cast if I used a plaster waste mould. The fingers were very vulnerable and chipping away the plaster would probably break them. This way, I could remove the 'mother' and gently cut away the rubber from the delicate fingers, leaving them intact. I painted the thickened Latex onto the clay and left it to dry.


Latex Rubber is a very economical medium for mould making and I often use it. It can be painted on with a brush, or original pieces can be dipped into it. Very fine detail can be captured, especially if the first coat is not thickened. The mould is built up to the correct thickness in layers. The hands only needed a fairly thin rubber layer so I painted on two coats of thickened Latex. It goes on white, but dries to an amber colour.

Clay wall added with indentations for keys
The two halves of the mould were made fairly thinly as the hands required only a little support from the mother . After a couple of hours, the halves were prised apart and the rubber moulds peeled away from the clay hands. I rinsed them out to remove any clay residue and returned the rubber moulds to the plaster 'mothers' , ensuring the two halves were correctly aligned.


Unfortunately, the cast was a failure. The plaster broke away from the wires which had not remained in the correct position inside the fingers. I started again. I dispensed with finger wires and just put a single thick garden wire through the hand into the middle finger and looped the protruding top end to enable a strong connection to the cavity later. When the plaster had set, I gently peeled away the rubber mould, cutting along one side to make removal easier and reducing the stress on the plaster.

This method worked quite well although a few of the fingers did break, even so. Notice how the two middle fingers, with reinforcing wire inside, remained intact. I was not disheartened, however. It was an easy fix.

I drilled small holes into each side of the break and inserted short lengths of thin garden wire. Both edges of each break were scratched, to form a key, then squished into position with fresh plaster.
 The repaired hands were then placed back into the mother mould for support until dry. The piece missing from one of the fingers was filled later. The fingers on this hand were thinner than the other. Too thin. I mixed up some casting plaster and while it was still very thin, dipped the fingers in a few times until the correct thickness was achieved. This worked remarkably well. The thin plaster clung to the fingers following the contours perfectly. I might try this method to make hands at some future date, just to see.


I decided to make the halo from rolled-out paper clay. It was rolled to the correct thickness and left to dry. As it dried, the began to warp and curl, so I placed weights all around the edge to keep it flat. It took a week to dry, being turned daily so each side dried at the same rate. This also helped to keep it flat.

I divided the circle into 16 sections to help keep the design symmetrical. The dried paper clay takes pencil very well and is very easy to draw onto.

I used copy paper to transfer the design onto the dried paper clay disc, using the 16 sections to help position each quarter correctly. There were a few adjustments made, but overall, this method worked very well.

Even though the disc is made from paper clay, it is very strong and although it will cut with a craft knife, the design is so intricate it would be very difficult to cut out the detail with a knife. I used a very small drill piece in my rotary drill to drill tiny holes around all the edges of the pieces to be removed. then I used the edge of the drill bit as a cutter going from one hole to the next. This achieved quite a smooth finish to the edges with little further sanding required.

I didn't like the tooth-edge on the original metal halo I was copying. I thought it looked too much like a cog. I altered the edge to look like flames, which I much prefer. The halo was refined and engraved using engraving bits on the rotary drill. I have a nifty flexible extension which enables me to hold the drill bit like a pen when working, with the heavy main drill body suspended from something nearby. I used the handle on a camera tripod set up next to me. The detail could have been carved by hand using lino cutters or small wood-cutting tools.

I embellished the front of the halo with paper clay balls and squares of rubber foam. The holes for the fixings were drilled after being marked using a paper template taken from the holes in the head and nails pushed through. The sharp nail points were removed using a hack-saw.

The halo was then painted with two coats of gold metallic wood and metal paint on both sides. As you can see, the halo was left without embellishment at the bottom as this is the part touching the shoulders and hair and would not sit flat with embellishments present.

 The hands were first positioned inside the cavities and the line of the holes in the robe followed with a drill bit through each arm. A piece of wire would hold each arm nicely in position as they dried. I slathered some thick, wet plaster on the end of the arm and squished it into the cavity. The arm was still a little loose, so I pulled it out and added a little more plaster around the arm before squishing it back inside the cavity. I pushed the wire through to hold it in place. Now, that was a mistake. Where the wire had pierced the cling film after the first fitting, the new plaster must have seeped through. I could not remove the arm once it was dry. I tried to wiggle it out, but it was stuck fast, even with the clingfilm. To make sure it was completely stuck, I decided to scrape away some plaster ll the way around the arm as deep as possible, pulling away the cling film as I went. Then I re-filled the gap with fresh plaster. I cut the wire off level with the robe the process of which made the hole a bit larger, filled the hole with plaster and smoothed it level with the robe. This would be invisible once painted. It didn't really matter that the hands would be permanently stuck in position. Even though it had been my intention otherwise. I secured the second hand after removing the cling film inside the cavity, still fitting a short wire through for extra security and filled the robe level.

As you can see, the arms fitted into the cavity revealing the outside edge of the original level of the sleeves as seen on the left of this picture, the right hand of the statue. I added a thick mix of decorator's filler to deepen the sleeves as you can see on the right of this picture after scoring and wetting the arm. I smoothed it and sculpted the shape with a wet paintbrush. By the time I had finished, the sleeves looked an integral part of the original statue with no visible join.


The position on the left was too high, so I lowered it to the position seen on the right. Then the final embellishments were added and the Halo was painted and left to dry.


necessary. This took a little time as the paint dries considerably darker. After each addition, I painted little sample on paper and left it to dry. Once I had matched up the colours, I re-produced the mix in a bigger batch for painting the large areas on the statue.
I am not going to bore you with the minutiae of each stage of the painting process. If you have any questions, feel free to ask. I will let the pictures speak for themselves. All I will say is that I changed elements I didn't like and made the whole project completely my own, whilst keeping to the Victorian spirit of the original. Painting is not really my thing. There are much better painters of detail out there. I did my very best and imbued the statue with something of me. I did it with love and patience and am very happy with the result. My beloved husband loves it and that is all I could ask for. I did it for him. I hope you enjoy it too. Here follow pictures taken along the way, ending with the final work of art. The Sacred Heart now stands in pride of place in our hallway.


This method worked quite well although a few of the fingers did break, even so. Notice how the two middle fingers, with reinforcing wire inside, remained intact. I was not disheartened, however. It was an easy fix.

I drilled small holes into each side of the break and inserted short lengths of thin garden wire. Both edges of each break were scratched, to form a key, then squished into position with fresh plaster.

The Boring Bit
While the hands were drying, I turned my attention back to the paintwork. The creative process of making the hands had refreshed me and enabled me to begin the boring and tedious sanding down of the paintwork. Much of it flaked off easily and the rest was painstakingly hand-sanded. The job became unexpectedly interesting when I was working on the cloak. As the paint layers were removed, original Victorian details were revealed.
 |
| Before Sanding |
 |
| After Sanding |
The most exciting moment came when the floral motifs were revealed on the thighs. They had been completely masked when the cloak was painted red. I had thought the red was original, but after revealing the motifs, I am of the opinion the cloak was originally cream with the gold motifs and black scalloping around the bottom edge. The stripe was gold and set back from the very edge.
 |
| Sanding Complete |
The Halo

The statue would have originally had a metal halo, There are two holes in the head for fixing. I scoured the internet for something appropriately ornate and downloaded a few pictures to choose from. There was really only one that stood out from the start, and it was the one eventually chosen.
I drew a quarter of the design onto paper and repeated it to make the whole, ensuring each quarter was the same.
I decided to make the halo from rolled-out paper clay. It was rolled to the correct thickness and left to dry. As it dried, the began to warp and curl, so I placed weights all around the edge to keep it flat. It took a week to dry, being turned daily so each side dried at the same rate. This also helped to keep it flat.

I divided the circle into 16 sections to help keep the design symmetrical. The dried paper clay takes pencil very well and is very easy to draw onto.

I used copy paper to transfer the design onto the dried paper clay disc, using the 16 sections to help position each quarter correctly. There were a few adjustments made, but overall, this method worked very well.

Even though the disc is made from paper clay, it is very strong and although it will cut with a craft knife, the design is so intricate it would be very difficult to cut out the detail with a knife. I used a very small drill piece in my rotary drill to drill tiny holes around all the edges of the pieces to be removed. then I used the edge of the drill bit as a cutter going from one hole to the next. This achieved quite a smooth finish to the edges with little further sanding required.

I didn't like the tooth-edge on the original metal halo I was copying. I thought it looked too much like a cog. I altered the edge to look like flames, which I much prefer. The halo was refined and engraved using engraving bits on the rotary drill. I have a nifty flexible extension which enables me to hold the drill bit like a pen when working, with the heavy main drill body suspended from something nearby. I used the handle on a camera tripod set up next to me. The detail could have been carved by hand using lino cutters or small wood-cutting tools.

I embellished the front of the halo with paper clay balls and squares of rubber foam. The holes for the fixings were drilled after being marked using a paper template taken from the holes in the head and nails pushed through. The sharp nail points were removed using a hack-saw.

The halo was then painted with two coats of gold metallic wood and metal paint on both sides. As you can see, the halo was left without embellishment at the bottom as this is the part touching the shoulders and hair and would not sit flat with embellishments present.
Back to the Hands

The hands needed to be fitted before the statue was painted as there would be wet plaster involved and I didn't want to risk getting on newly painted robes. I wrapped cling film around the statue below the arms and pushed a layer into the cavities to stop the plaster sticking. I wanted to be able to remove the arms as with the original. This would just make it safer when moving the statue from one place to another. The moulded hands were already almost the full shape of each cavity. I had left just a little space to fill for the final fitting.


As you can see, the arms fitted into the cavity revealing the outside edge of the original level of the sleeves as seen on the left of this picture, the right hand of the statue. I added a thick mix of decorator's filler to deepen the sleeves as you can see on the right of this picture after scoring and wetting the arm. I smoothed it and sculpted the shape with a wet paintbrush. By the time I had finished, the sleeves looked an integral part of the original statue with no visible join.

It was at this point that the halo was cut out of the paper clay disc, while the additions to the hands were drying. Before it was painted, the halo was positioned on the head. I had to make a few holes before I was happy with the positioning. The extra holes were then filled and are not visible.


The Paint Restoration
Before I had sanded the statue, I matched-up the paint colours using colour charts. I wanted to re-create the colours as best I could as I liked them so much. The first thing to do was to mix the paints. I used Artist's Acrylic paints, starting off with a couple of colours and adding until I achieved the hue


necessary. This took a little time as the paint dries considerably darker. After each addition, I painted little sample on paper and left it to dry. Once I had matched up the colours, I re-produced the mix in a bigger batch for painting the large areas on the statue.
I am not going to bore you with the minutiae of each stage of the painting process. If you have any questions, feel free to ask. I will let the pictures speak for themselves. All I will say is that I changed elements I didn't like and made the whole project completely my own, whilst keeping to the Victorian spirit of the original. Painting is not really my thing. There are much better painters of detail out there. I did my very best and imbued the statue with something of me. I did it with love and patience and am very happy with the result. My beloved husband loves it and that is all I could ask for. I did it for him. I hope you enjoy it too. Here follow pictures taken along the way, ending with the final work of art. The Sacred Heart now stands in pride of place in our hallway.


 |
| Sacred Heart In-Situ |